JVC KW-AVX820 Instructions - Page 19
Storing your own adjustments, Equalizer - installation
 |
UPC - 046838036569
View all JVC KW-AVX820 manuals
Add to My Manuals
Save this manual to your list of manuals |
Page 19 highlights
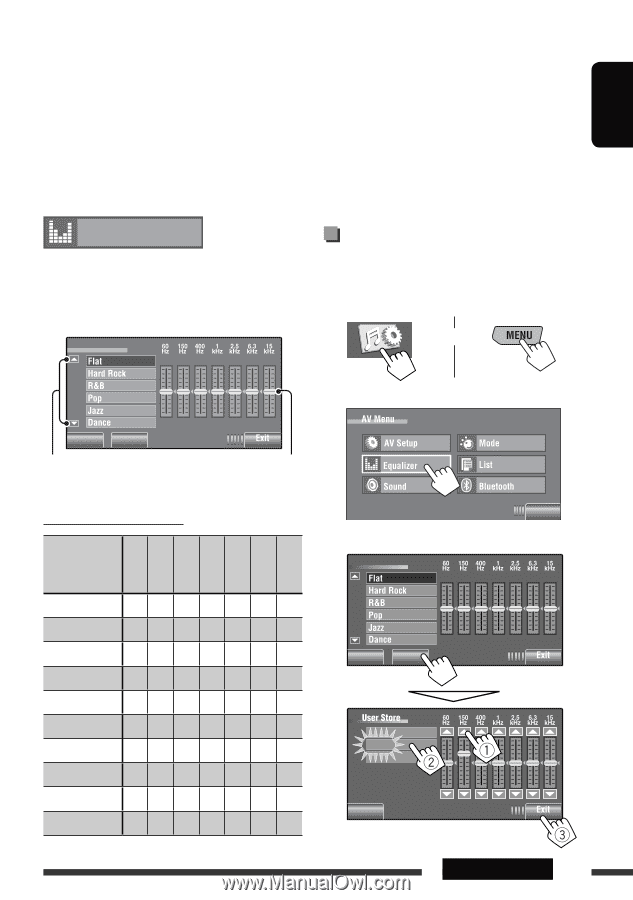
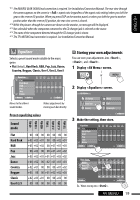
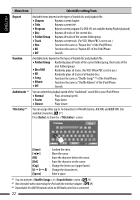
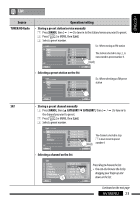
ENGLISH *11 The REVERSE GEAR SIGNAL lead connection is required. See Installation/Connection Manual. The rear view through the camera appears on the screen in aspect ratio (regardless of the aspect ratio setting) when you shift the gear to the reverse (R) position. When you press DISP on the monitor panel, or when you shift the gear to another position other than the reverse (R) position, the rear view screen is cleared. *12 While the pictures through the camera are shown on the monitor, no message will be displayed. *13 Not selectable when the component connected to the CD changer jack is selected as the source. *14 The name of the component detected through the CD changer jack is shown. *15 The TEL MUTING lead connection is required. See Installation/Connection Manual. Equalizer Selects a preset sound mode suitable to the music genre. ♦ Flat (Initial), Hard Rock, R&B, Pop, Jazz, Dance, Country, Reggae, Classic, User1, User2, User3 Equalizer Storing your own adjustments You can store your adjustments into , , and . 1 Display screen. or 2 Display screen. Back Edit Moves to the other 6 sound modes. Makes adjustments by moving each bar directly. Preset equalizing values 60 Hz 150 Hz 400 Hz 1 kHz 2.5 kHz 6.3 kHz 15 kHz Sound mode Flat Hard Rock R&B Pop Jazz Dance Country Reggae Classic User1/2/3 00 00 00 00 00 00 00 +03 +03 +01 00 00 +02 +01 +03 +02 +02 00 +01 +01 +03 00 +02 00 00 +01 +01 +02 +03 +02 +01 +01 +01 +03 +02 +04 +02 00 -02 -01 +01 +01 +02 +01 00 00 00 +01 +02 +03 00 00 +01 +02 +02 +03 +02 +03 +01 00 00 +02 00 00 00 00 00 00 00 00 Exit 3 Make the setting, then store. Equalizer Back Edit User1 User2 User3 Back Ex.: When storing into . AV MENU 19
-
 1
1 -
2
-
3
-
4
-
5
-
6
-
7
-
8
-
9
-
10
-
11
-
12
-
13
-
 14
14 -
 15
15 -
 16
16 -
 17
17 -
 18
18 -
 19
19 -
 20
20 -
 21
21 -
 22
22 -
 23
23 -
 24
24 -
25
-
26
-
27
-
28
-
29
-
30
-
31
-
32
-
33
-
34
-
35
-
36
-
37
-
38
-
39
-
40
-
41
-
42
-
43
-
44
-
45
-
46
-
47
-
48
-
49
-
50
-
51
-
52
-
53
-
54
-
55
-
56
-
57
-
58
-
59
-
60
-
61
-
62
-
63
-
64
-
65
-
66
-
67
-
68
-
69
-
70
-
71
-
72
-
73
-
74
-
75
-
76
-
77
-
78
-
79
-
80
-
81
-
82
-
83
-
84
-
85
-
86
-
87
-
88
-
89
-
90
-
91
-
92
-
93
-
94
-
95
-
96
-
97
-
98
-
99
-
100
-
101
-
102
-
103
-
104
-
105
-
106
-
107
-
108
-
109
-
110
-
111
-
112
-
113
-
114
-
115
-
116
-
117
-
118
-
119
-
120
-
121
-
122
-
123
-
124
-
125
-
126
-
127
-
128
-
129
-
130
-
131
-
132
-
133
-
134
-
135
-
136
-
137
-
138
-
139
-
140
-
141
-
142
-
143
-
144
-
145
-
146
-
147
-
148
-
149
-
150
-
151
-
152
-
153
-
154
-
155
-
156
-
157
-
158
-
159
-
160
-
161
-
162
-
163
-
164
-
165
-
166
-
167
-
168
-
169
-
170
-
171
-
172
-
173
-
174
-
175
-
176
-
177
-
178
-
179
-
180
-
181
-
182
-
183
-
184
-
185
-
186
-
187
-
188
-
189
-
190
-
191
-
192
-
193
-
194
-
195
-
196
-
197
-
198
-
199
-
200
-
201
-
202
-
203
-
204
-
205
-
206
-
207
 |
 |