JVC KW-V40BT Instruction Manual - Page 4
Initial Settings - color rear view camera
 |
View all JVC KW-V40BT manuals
Add to My Manuals
Save this manual to your list of manuals |
Page 4 highlights
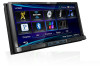
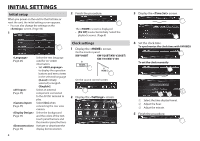
INITIAL SETTINGS Initial setup When you power on the unit for the first time or reset the unit, the initial setting screen appears. • You can also change the settings on the screen. (Page 44) 1 2 Finish the procedure. The screen is displayed. • [AV Off] is selected initially. Select the playback source. (Page 8) Select the text language (Page 46) used for on-screen information. • Set to display the operation buttons and menu items in the selected language ([Local]: initially selected) or English ([English]). Select an external (Page 45) component connected to the AV-IN1 terminal to play. Select [On] when (Page 45) connecting the rear view camera. Select the background (Page 45) and the colors of the text, touch panel buttons and the monitor panel buttons. Activate or deactivate the (Page 45) display demonstration. 4 Clock settings 1 Display the screen. On the monitor panel: KW-V40BT KW-V20BT/KW-V200BT/ KW-V10/KW-V100 On the source control screen: 2 Display the screen. 3 Display the screen. 4 Set the clock time. To synchronize the clock time with FM RBDS To set the clock manually 1 Select the time display format. 2 Adjust the hour. 3 Adjust the minute. 5 Finish the procedure.
-
 1
1 -
 2
2 -
 3
3 -
 4
4 -
 5
5 -
 6
6 -
 7
7 -
 8
8 -
 9
9 -
 10
10 -
11
-
12
-
13
-
14
-
15
-
16
-
17
-
18
-
19
-
20
-
21
-
22
-
23
-
24
-
25
-
26
-
27
-
28
-
29
-
30
-
31
-
32
-
33
-
34
-
35
-
36
-
37
-
38
-
39
-
40
-
41
-
42
-
43
-
44
-
45
-
46
-
47
-
48
-
49
-
50
-
51
-
52
-
53
-
54
-
55
-
56
-
57
-
58
-
59
-
60
-
61
-
62
-
63
-
64
-
65
-
66
-
67
-
68
-
69
-
70
-
71
-
72
-
73
-
74
-
75
-
76
-
77
-
78
-
79
-
80
-
81
-
82
-
83
-
84
-
85
-
86
-
87
-
88
-
89
-
90
-
91
-
92
-
93
-
94
-
95
-
96
-
97
-
98
-
99
-
100
-
101
-
102
-
103
-
104
-
105
-
106
-
107
-
108
-
109
-
110
-
111
-
112
-
113
-
114
-
115
-
116
-
117
-
118
-
119
-
120
-
121
-
122
-
123
-
124
-
125
-
126
-
127
-
128
-
129
-
130
-
131
-
132
-
133
-
134
-
135
-
136
-
137
-
138
-
139
-
140
-
141
-
142
-
143
-
144
-
145
-
146
-
147
-
148
-
149
-
150
-
151
-
152
-
153
-
154
-
155
-
156
-
157
-
158
-
159
-
160
-
161
-
162
-
163
-
164
-
165
-
166
-
167
-
168
-
169
-
170
-
171
-
172
-
173
-
174
-
175
-
176
-
177
-
178
-
179
-
180
-
181
-
182
-
183
-
184
-
185
-
186
-
187
-
188
 |
 |
