JVC KW-Z1000W Quick Start Guide America - Page 28
Installing the main unit, peripheral equipment.
 |
View all JVC KW-Z1000W manuals
Add to My Manuals
Save this manual to your list of manuals |
Page 28 highlights
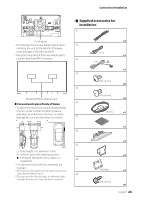
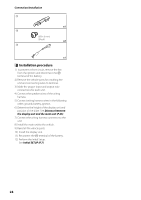
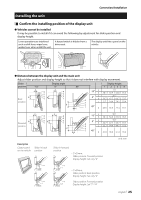
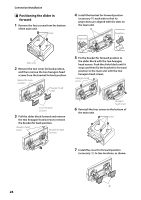
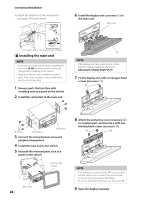
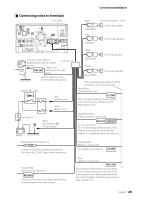
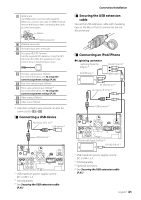
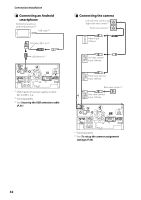
Connection/Installation 5) Adjust the direction of the microphone (accessory 3) to the driver. 3 6 Install the display unit (accessory 8) to the main unit. Main unit Fix a cable with a commercial item of tape. ÑÑInstalling the main unit NOTE • Determine the slider position before installing the main unit. (P.26) The slider position cannot be changed after installing to the vehicle. • Make sure that the unit is installed securely in place. If the unit is unstable, it may malfunction (eg, the sound may skip). 1 Remove parts that interfere with installing such as a panel on the vehicle. 2 Install the car bracket to the main unit. 8 NOTE • If the display unit hits a panel on the vehicle, adjust the display height by referring to Adjusting the display height (P.27). 7 Fix the display unit with six hexagon head screws (accessory -). - 4 or 5 Car bracket Main unit 3 Connect the wiring harness wires and peripheral equipment. 4 Install the main unit to the vehicle. 5 Reinstall the removed parts such as a panel on the vehicle. Panel on the vehicle Main unit 28 8 Attach the protective cover (accessory =) to coupling part, and then fix it with two binding head screws (accessory ~). ~ = NOTE • If the protective cover (accessory =) is not attached, this unit will not turn on. Even if the unit is turned on, the power may be turned off halfway. Be sure to attach the protective cover (accessory =). 9 Raise the display manually.
-
 1
1 -
2
-
3
-
4
-
5
-
6
-
7
-
8
-
9
-
10
-
11
-
12
-
13
-
14
-
15
-
16
-
17
-
18
-
19
-
20
-
21
-
22
-
 23
23 -
 24
24 -
 25
25 -
 26
26 -
 27
27 -
 28
28 -
 29
29 -
 30
30 -
 31
31 -
 32
32 -
 33
33 -
34
-
35
-
36
-
37
-
38
-
39
-
40
-
41
-
42
-
43
-
44
-
45
-
46
-
47
-
48
-
49
-
50
-
51
-
52
-
53
-
54
-
55
-
56
-
57
-
58
-
59
-
60
-
61
-
62
-
63
-
64
-
65
-
66
-
67
-
68
-
69
-
70
-
71
-
72
-
73
-
74
-
75
-
76
-
77
-
78
-
79
-
80
-
81
-
82
-
83
-
84
-
85
-
86
-
87
-
88
-
89
-
90
-
91
-
92
-
93
-
94
-
95
-
96
-
97
-
98
-
99
-
100
-
101
-
102
-
103
-
104
 |
 |
