JVC LT-32D200 Instructions - Page 49
Troubleshooting
 |
UPC - 046838037153
View all JVC LT-32D200 manuals
Add to My Manuals
Save this manual to your list of manuals |
Page 49 highlights
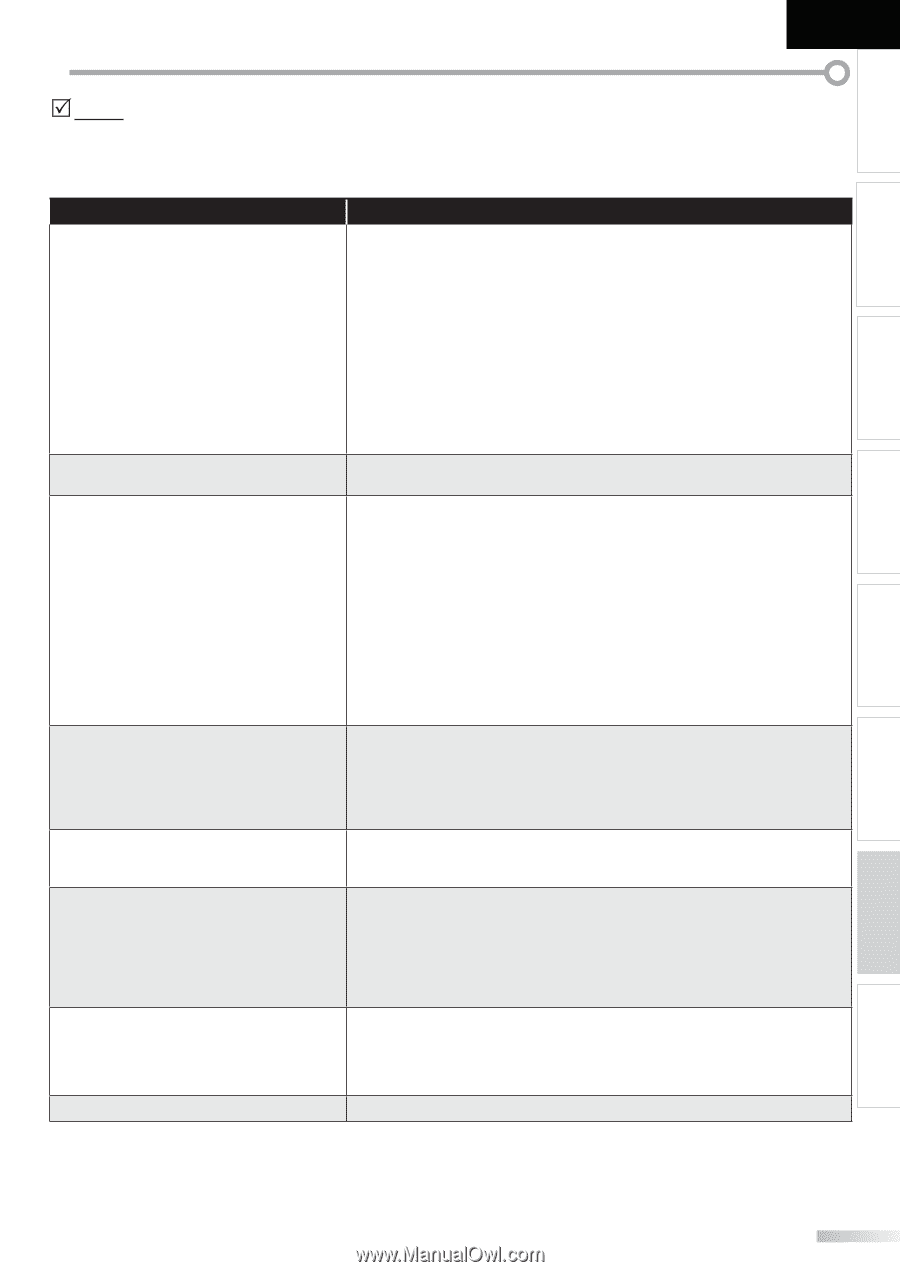
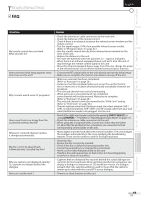
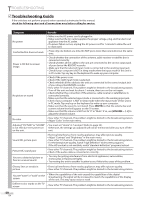
INTRODUCTION PREPARATION WATCHING TV OPTIONAL SETTING OPERATING DVD DVD SETTING TROUBLESHOOTING INFORMATION English TROUBLESHOOTING 5 FAQ Question My remote control does not work. What should I do? How come the Initial setup appears every time I turn on this unit? Why I cannot watch some TV programs? How come there is no image from the connected external devices? Whenever I entered channel number, it changes automatically. My disc cannot be played back. Is there any way I can play my disc? Why are captions not displayed entirely? Or, captions are delayed behind the dialogue. How can I set the clock ? Answer • Check the antenna or cable connection to the main unit. • Check the batteries of the remote control. • Check if there is an obstacle between the infrared sensor window and the remote control. • Test the signal output. If OK, then possible infrared sensor trouble. (Refer to "IR Signal Check" on page 52.) • Aim the remote control directly at the infrared sensor window on the front of the unit. • Reduce the distance to the unit. • Re-insert the batteries with their polarities (+/- signs) as indicated. • When there is an infrared-equipped device such as PC near this unit, it may interrupt the remote control signal of this unit. • Move the infrared-equipped device away from this unit, change the angle of the infrared sensor or turn off the infrared communication function. • Connect the RF coaxial cable to the unit directly and run the initial setup. • Make sure to complete the channel scan before turning off the unit. • Make sure autoscan has been completed. (Refer to "Autoscan" on page 20.) • Autoscan must be completed when you set up the unit for the first time or move it to a location where previously unavailable channels are broadcast. • The selected channel may not be broadcasting. • When autoscan is interrupted and not completed, some channels will not be received. Make sure to complete. (Refer to "Autoscan" on page 20.) • The selected channel cannot be viewed by the "Child Lock" setting. (Refer to ''Child Lock" on page 28.) • The unit requires some kind of antenna input. An indoor antenna (VHF / UHF), an external antenna (VHF /UHF) or an RF coaxial cable from your wall cable/satellite box needs to be plugged into the unit. • Check if the right input mode is selected by pressing [INPUT SELECT] or using [CHANNEL - / +]. (Refer to "Switching Each Input Mode" on page 17.) • Check the antenna or cable connection to the unit. • When using the Composite Video Connection check that the Green (Y), Blue (Pb/Cb) and Red (Pr/Cr) connectors are connected to their corresponding colored jacks on the unit. • Many digital channels have alternate channel numbers. The unit changes the numbers automatically to the ones signifying the broadcasting stations. These are the numbers used for analog broadcasts. • Clean the disc. • Ensure the disc is correctly inserted. • Check if the disc is defective by trying another disc. • Cancel the parental lock or change the control level. • Insert a correct disc that plays back on this unit. • Handle a disc with special care so that it does not have fingerprints, scratches or dusts on its surface. • Captions that are delayed a few seconds behind the actual dialogue are common for live broadcasts. Most captioning production companies can display a dialogue to maximum of 220 words per minute. If a dialogue exceeds that rate, selective editing is used to insure that the captions remain up-to date with the current TV screen dialogue. • There is no clock function on this unit. 49 EN
-
 1
1 -
2
-
3
-
4
-
5
-
6
-
7
-
8
-
9
-
10
-
11
-
12
-
13
-
14
-
15
-
16
-
17
-
18
-
19
-
20
-
21
-
22
-
23
-
24
-
25
-
26
-
27
-
28
-
29
-
30
-
31
-
32
-
33
-
34
-
35
-
36
-
37
-
38
-
39
-
40
-
41
-
42
-
43
-
 44
44 -
 45
45 -
 46
46 -
 47
47 -
 48
48 -
 49
49 -
 50
50 -
 51
51 -
 52
52 -
 53
53 -
 54
54 -
55
-
56
 |
 |