JVC LT 42P300 Instructions - Page 13
TV Basic Controls - remote
 |
UPC - 046838037221
View all JVC LT 42P300 manuals
Add to My Manuals
Save this manual to your list of manuals |
Page 13 highlights
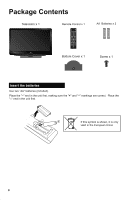
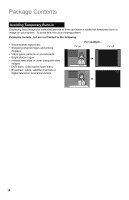
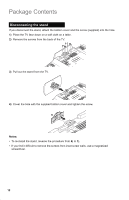
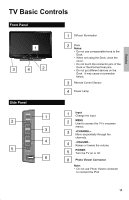
Basics TV Basic Controls Front Panel 1 3 4 2 Side Panel INPUT 1 2 MENU CHANNEL 3 OK VOLUME 4 BACK 5 POWER 6 PHOTO VIEWER 1 Diffuser Illumination 2 Dock Notes: • Do not use unreasonable force to the Dock. • When not using the Dock, close the cover. • Do not touch the connector pins of the Dock or the iPod terminal pins. • Do not put different devices on the Dock. It may cause a connection failure. 3 Remote Control Sensor 4 Power Lamp 1 Input Change the input 2 MENU Used to access the TV's onscreen menus. 3 +CHANNEL- Move sequentially through the channels. 4 +VOLUME- Raises or lowers the volume. 5 POWER Turn the TV on or off. 6 Photo Viewer Connector Note: • Do not use Photo Viewer connector to connect the iPod 13
-
 1
1 -
2
-
3
-
4
-
5
-
6
-
7
-
 8
8 -
 9
9 -
 10
10 -
 11
11 -
 12
12 -
 13
13 -
 14
14 -
 15
15 -
 16
16 -
 17
17 -
 18
18 -
19
-
20
-
21
-
22
-
23
-
24
-
25
-
26
-
27
-
28
-
29
-
30
-
31
-
32
-
33
-
34
-
35
-
36
-
37
-
38
-
39
-
40
-
41
-
42
-
43
-
44
-
45
-
46
-
47
-
48
-
49
-
50
-
51
-
52
-
53
-
54
-
55
-
56
-
57
-
58
-
59
-
60
-
61
-
62
-
63
-
64
-
65
-
66
-
67
-
68
 |
 |

13
Notes:
•
Do not use unreasonable force to the
Dock.
•
When not using the Dock, close the
cover.
•
Do not touch the connector pins of the
Dock or the iPod terminal pins.
•
Do not put different devices on the
Dock.
It may cause a connection
failure.
Front Panel
Side Panel
INPUT
MENU
CHANNEL
VOLUME
OK
BACK
POWER
PHOTO VIEWER
TV Basic Controls
Dock
Diffuser Illumination
Remote Control Sensor
Input
Change the input
MENU
Used to access the TV’s onscreen
menus.
+CHANNEL–
Move sequentially through the
channels.
+VOLUME–
Raises or lowers the volume.
POWER
Turn the TV on or off.
Photo Viewer Connector
3
1
6
4
3
2
1
2
5
3
1
6
4
2
5
Basics
3
2
1
4
Power Lamp
4
Note:
•
Do not use Photo Viewer connector
to connect the iPod