JVC TK-C215VP12U Instructions - Page 20
Setting the switches
 |
UPC - 046838027482
View all JVC TK-C215VP12U manuals
Add to My Manuals
Save this manual to your list of manuals |
Page 20 highlights
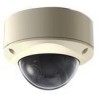
Installation and Connection Setting the switches Remove the dome cover, followed by setting the video image switches. 1. Removing the dome cover Remove the dome cover by unfastening the 3 fastening screws using the wrench supplied. Memo: ● The dome cover and base are connected with fall prevention wire. 3. Setting the switches Set the switches for video images. (APg. 12 eSetting the Switches and the Lens (TK-C215VP4U/E)f) (APg. 14 eSetting the Switches and the Lens (TK-C215VP12U/E)f) Inner 2 Dome Fall Prevention Wire Wrench (Supplied) Clip(x 3) 3 LL PHASE 1 2 O N2 3 4 4 5 6 WHT. 7 BAL. 8 *TK-C215VP4U/E is used in the above illustration *TK-C215VP4U/E is used in the above illustration 2. Removing the inner dome The inner dome is fastened using clips at 3 different positions. Grasp the inner dome and remove it from the clips. Note: ● Before touching the camera unit, make sure to touch the metal surface of the [MONITOR] terminal to discharge any static electricity from your body. Static electricity may cause the camera to malfunction. 20
-
 1
1 -
2
-
3
-
4
-
5
-
6
-
7
-
8
-
9
-
10
-
11
-
12
-
13
-
14
-
 15
15 -
 16
16 -
 17
17 -
 18
18 -
 19
19 -
 20
20 -
 21
21 -
 22
22 -
 23
23 -
 24
24 -
 25
25 -
26
-
27
-
28
-
29
-
30
-
31
-
32
-
33
-
34
-
35
-
36
-
37
-
38
-
39
-
40
 |
 |
