Jensen UCD200 Owners Manual - Page 8
Bass Control, Treble Control, Left/Right Balance Control, Rear/Front Fader Control, Loudness Control
 |
UPC - 043258301659
View all Jensen UCD200 manuals
Add to My Manuals
Save this manual to your list of manuals |
Page 8 highlights
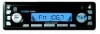
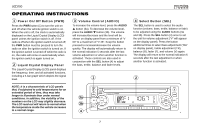
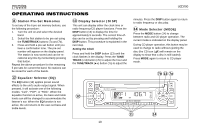
UCD200 OPERATING INSTRUCTIONS 4 Bass Control To adjust the bass level, first select the Bass mode by pressing the SEL button (4) until "BA" appears on the display panel. Within five seconds, press the AUDIO buttons (3a and 3b) to adjust the bass response from a minimum of "B--7" to a maximum of "B 7" ("B 0" represents a flat response). 4 Treble Control To adjust the treble level, press the SEL button (4) until "TR" appears on the display panel. Within five seconds, press the AUDIO buttons (3a and 3b) to adjust the treble from a minimum of "TR -7" to a maximum of "TR 7". "TR 0" represents a flat response. 4 Left/Right Balance Control To adjust the left/right speaker balance, press the SEL button (4) until the "B" indication appears on the display panel (if not equally balanced, "BL" or "BR", followed by the balance level, will appear). Within five seconds, press the AUDIO buttons (3a and 3b) to adjust the balance between the left and right speakers from "BL 15" (full left) to "BR 15" (full right). "B 00" represents an equal balance level between the left and right speakers. 4 Rear/Front Fader Control To adjust the front/rear speaker balance, press the SEL button (4) until "F" appears on the display panel. Within five seconds, press the AUDIO buttons (3a and 3b) to adjust the balance between the rear and front speakers from "FR 15" (full rear) to "FF 15" (full front). "F 00" represents an equal balance level between the rear and front speakers. 5 AM/FM Band Selector (BAND) During radio play, each time the BAND button (5) is pressed, the radio band changes. The indications "AM 1", "AM 2", " FM 1", "FM 2", or "FM 3" will appear on the display panel according to your selection. 6 Loudness Control (LOU) When listening to music at low volume levels, this feature will boost the bass and treble ranges to compensate for the characteristics of human hearing. Press the LOU button (6) to activate this feature as indicated by a beep tone and "LOUD" appearing on the display panel. ("LOUD" remains on the display.) Pressing the button again will sound a beep tone and "LOUD" will disappear from the display. RELEASE EJECT / UCD200 PWR MON 3a EQ AUDIO DISP TUNE TRACK LOU 6 3b SEL BAND AM / FM / CD RECEIVER MUT AMS 1 2 SCN 3 RPT 4 RDM 5 6 MODE 4 5 8
-
 1
1 -
2
-
 3
3 -
 4
4 -
 5
5 -
 6
6 -
 7
7 -
 8
8 -
 9
9 -
 10
10 -
 11
11 -
 12
12 -
 13
13 -
14
-
15
-
16
-
17
-
18
-
19
-
20
-
21
-
22
-
23
-
24
-
25
-
26
-
27
-
28
-
29
-
30
-
31
-
32
-
33
-
34
-
35
-
36
-
37
-
38
-
39
-
40
-
41
-
42
-
43
-
44
-
45
-
46
-
47
 |
 |
