Jensen UV8 Instruction Manual - Page 17

Tuner TFT Display, Switching to Radio Tuner Source, Selecting FM/AM Band, Seek Tuning, Manual Tuning

Page 17 highlights

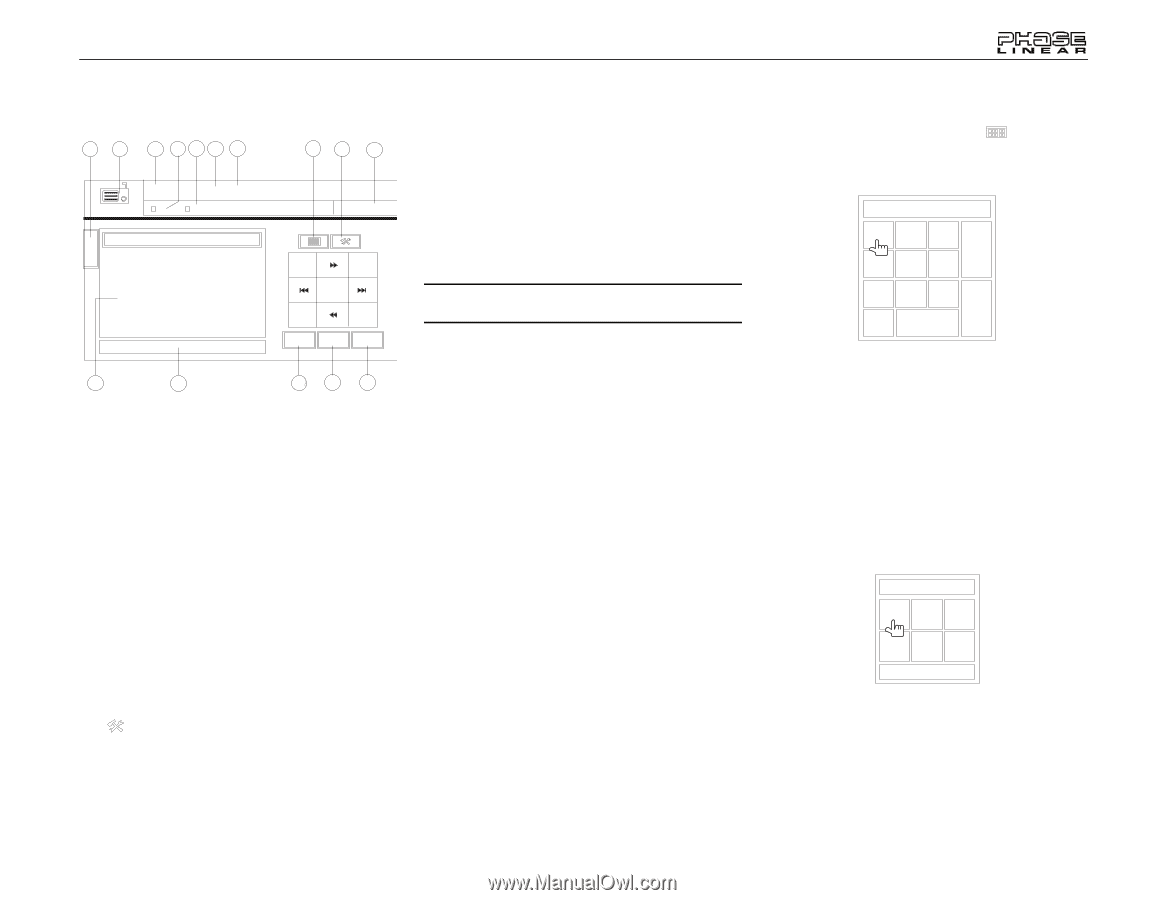
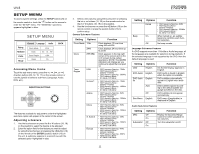
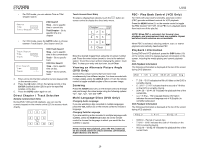
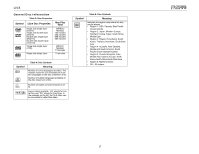
UV8 TUNER OPERATION Tuner TFT Display 8 17 1 4 5 10 2 9 18 3 FM-1 P1 87.5 MHz RADIO ST LOC 01:02 PM P1 E Q P2 P3 P4 P5 P6 PS: 87.5 MHz 90.1 MHz 98.1 MHz 106.1 MHz 107.9 MHz 102.9 MHz AS BAND PS MEM 6 7 15 21 20 18 1. Current radio band indicator 2. Radio frequency indicator 3. Clock 4. Stereo broadcasting indicator 5. Strong Local signal broadcasting indicator 6. Preset radio stations: Touch to recall preset stations 7. Information about the current function 8. Touch for quick access to Equalizer level settings 9. Touch to access the direct entry screen 10. Current preset station indicator 11. ||: Touch to seek forward 13. : Touch to tune forward one step 15. BAND: Touch to change between AM/FM bands 16. AS: Touch to automatically store stations 17. Touch to view the SOURCE MENU and select a new playback source 18. MEM: View screen used to enter current channel into preset memory 19. : Touch to view the SETUP menu 20. PS (Preview Scan): Touch to scan all stations available, stopping for 5 seconds at each and continuing until a station is selected Switching to Radio Tuner Source • Touch the top left corner of the screen (the RADIO circle) to view the SOURCE MENU. Touch "Radio". • Press the SRC button (6) on the front panel or remote control (8) to switch to the AM/FM or RADIO source. Selecting FM/AM Band Touch the BAND button (15) on the screen, or press the BAND button on the unit (4) or remote control (18) to change between the following bands: FM1, FM2, FM3, AM1, and AM2. NOTE: The BAND button on the unit only works when the TFT is closed. Seek Tuning To seek the next higher station: • Touch the >>| button on screen. • Press the >>| button (17) on remote control. • Press the > button on the joystick (17). To seek the next lower station: • Touch the | or

  • 1
  • 2
  • 3
  • 4
  • 5
  • 6
  • 7
  • 8
  • 9
  • 10
  • 11
  • 12
  • 13
  • 14
  • 15
  • 16
  • 17
  • 18
  • 19
  • 20
  • 21
  • 22
  • 23
  • 24
  • 25
  • 26
  • 27
  • 28
  • 29
  • 30

13
UV8
TUNER OPERATION
Tuner TFT Display
1.
Current radio band indicator
2.
Radio frequency indicator
3.
Clock
4.
Stereo broadcasting indicator
5.
Strong Local signal broadcasting indicator
6.
Preset radio stations: Touch to recall preset stations
7.
Information about the current function
8.
Touch for quick access to Equalizer level settings
9.
Touch to access the direct entry screen
10.
Current preset station indicator
11.
|<<
: Touch to seek backward
12.
>>|
: Touch to seek forward
13.
<<
: Touch to tune backward one step
14.
>>
: Touch to tune forward one step
15.
BAND
: Touch to change between AM/FM bands
16.
AS
: Touch to automatically store stations
17.
Touch to view the SOURCE MENU and select a new
playback source
18.
MEM
: View screen used to enter current channel into
preset memory
19.
: Touch to view the SETUP menu
20.
PS
(Preview Scan): Touch to scan all stations available,
stopping for 5 seconds at each and continuing until a
station is selected
Switching to Radio Tuner Source
Touch the top left corner of the screen (the RADIO
circle) to view the SOURCE MENU. Touch “Radio”.
Press the
SRC
button (6) on the front panel or remote
control (8) to switch to the AM/FM or RADIO source.
Selecting FM/AM Band
Touch the
BAND
button (15) on the screen, or press the
BAND
button on the unit (4) or remote control (18) to change
between the following bands: FM1, FM2, FM3, AM1, and
AM2.
NOTE: The BAND button on the unit only works when the
TFT is closed.
Seek Tuning
To seek the next higher station:
Touch the
>>|
button on screen.
Press the
>>|
button (17) on remote control.
Press the
>
button on the joystick (17).
To seek the next lower station:
Touch the
|<<|
button on screen.
Press the
|<<
button (15) on the remote control.
Press the
<
button on the joystick (16).
Manual Tuning
To increase or decrease the tuning frequency one step:
Touch the
>>
or
<<
buttons on screen.
Press the
>>
or
<<
buttons (12, 20) on the remote
control.
Press the
/\
or
V
buttons (18, 19) on the joystick.
Direct Tuning
To enter a radio station directly, touch the
button or
press the
GOTO
button (19) on the remote control to display
the direct entry menu.
Enter the desired radio station using the on-screen number
pad. Press the enter button (arrow) to tune to the selected
station. To exit the screen without changing the station, touch
Exit
. To clear your entry and start over, touch
Clear
.
Using Preset Stations
Six numbered preset buttons store and recall stations for
each band. All six stored stations (P1-P6) for the current
band appear on the screen.
Storing a Station
1.
Select a band (if needed), then select a station.
2.
Touch the on-screen
MEM
button (18) to open the
preset screen.
3.
Touch the preset number in which you would like to
store the current station (or press
EXIT
to cancel and
close the menu). The preset number and station
appears highlighted.
4
1
10
5
7
8
3
6
17
FM-1
P1
87.5 MHz
01:02 PM
E
Q
AS
BAND
PS
MEM
P1
87.5
MHz
P2
90.1
MHz
P3
98.1
MHz
P4
106.1
MHz
P5
107.9
MHz
P6
102.9
MHz
PS:
ST
LOC
2
RADIO
20
15
18
18
9
FM: _ _ _ . _ MHz
1
2
3
4
5
6
7
8
9
0
Clear
Exit
ENT
Preset: _
Exit
P1
P2
P3
P4
P5
P6