Kenmore 27514 Owners Manual - Page 7
Warning, Poweriviate - vacuum
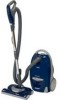 |
View all Kenmore 27514 manuals
Add to My Manuals
Save this manual to your list of manuals |
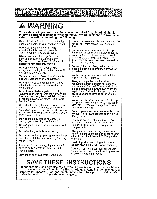
Page 7 highlights
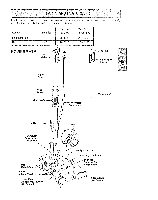
Please pay special attention to these hazard alert boxes, and fotiow any instruc- tsiohnosck, gibvuernns aWndARpNeIrNsGonal stiantjeumrye. ntCsAUaTlIeOrtN yosutatetomesnutcsh adlearntgeyrosu toassuficrhe, dealnegcetrrisc as personal injury and!or property damage. _,,,.411.d. ,. i.i.ii. I .. iiilff i WARNING =lectrical Shock Hazard NOT plug into electrical supply until assembly is complete, Failure to do so could result in electrical shock or injury. Before assembling vacuum cleaner, check the PACKING LIST on the cover of the separate REPAIR PARTS LIST_ Use this list to verify that you have received all the components of your new Kenmore vacuum cleaner. WANDS Slide wands together until wand button snaps into place Turn wand button to the slotted area of the wand swivel. Button The swivel allows you to turn the handle to the left side to reach farther under few furniture. Swivel -- Cord Holder j POWERIVIATE 1. Insert wands into PowerMate until the wand button snaps Area into place 2. Connect PewerMate plug and cord as shown. DO NOT force. Raised area of plug must be toward hand 3. Secure cord into the cord holder on the wand swivel. To remove: Step on wand quick release pedal, then pull up on wands, Handle _ Lock Button Upper Wand I m Wand Button Wand Swivel Lower Wand m Quick Release Pedal
-
 1
1 -
 2
2 -
 3
3 -
 4
4 -
 5
5 -
 6
6 -
 7
7 -
 8
8 -
 9
9 -
 10
10 -
 11
11 -
 12
12 -
13
-
14
-
15
-
16
-
17
-
18
-
19
-
20
-
21
-
22
-
23
 |
 |
