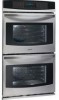
Kenmore 4812 Installation Instructions
Kenmore 4812 - Elite 27 in. Double Wall Oven Manual
 |
View all Kenmore 4812 manuals
Add to My Manuals
Save this manual to your list of manuals |
Kenmore 4812 manual content summary:
- Kenmore 4812 | Installation Instructions - Page 1
ANTi=TIP DEVICE PACKED WiTH RANGE • SEE iNSTALLATiON iNSTRUCTiONS I_ if the information in this I manual is not followed exactly, a fire or I to the Consumer = Keep these instructions with your Use & Care Guide for future reference. = As when using any appliance generating heat, there are certain - Kenmore 4812 | Installation Instructions - Page 2
Care Guide, read it carefully. Special instructions for appliances installed in the State of Massachusetts: This appliance can only manual gas valve must be installed in the gas supply line to this appliance. = Be sure your range is installed and grounded properly by a qualified installer or service - Kenmore 4812 | Installation Instructions - Page 3
. 14). Pipe joint sealant that resists action of LP/Propane gas (Fig. 15). Gas line manual shut-off valve (Fig. 16). 1/2" NPT 90 ° black pipe elbow (Fig. 17). A new flexible metal appliance conduit (1/2" N PT x 3/4" or 1/2" I.D.) must be design certified by CSA International (Fig. 18). Because solid - Kenmore 4812 | Installation Instructions - Page 4
To eliminate the risk of burns or fire by reaching over heated surface units, cabinet storage space located above the surface units should be avoided, if cabinet storage is to be provided, the risk can be reduced by installing a range hood that projects horizontally a minimum of 5" beyond the bottom - Kenmore 4812 | Installation Instructions - Page 5
the range itself. If range is ever moved to a different location, the anti= tip brackets must also be moved and installed with the range. Instructions are provided for installation in wood or cement fastened to either the floor or wall. When installed to the wall, make sure that screws completely - Kenmore 4812 | Installation Instructions - Page 6
Cord Kit RISK OF FIRE OR ELECTRICAL SHOCK MAY OCCUR IF AN INCORRECT SIZE RANGE CORD KIT IS USED, THE INSTALLATION INSTRUCTIONS ARE NOT FOLLOWED OR STRAIN RELIEF BRACKET IS DISCARDED. This appliance may be connected by means of a power supply cord. Only a power supply cord kit rated at 125/250 volts - Kenmore 4812 | Installation Instructions - Page 7
Dia. Hole (See Chart) Wiring instructions (4-wire connection - See fig. 33) Before wiring the range review the suggested power source location drawing in the ground wire (Green) lead with the eyelet to the frame of the appliance with the ground screw using the same hole in the frame where the ground - Kenmore 4812 | Installation Instructions - Page 8
and replace the rear access cover (See Fig. 30). Grounding instructions connections ONLY) (for 3-Wire A ground strap is installed on . connection connection = follow = follow Steps Steps Before wiring the range, review the suggested power source location drawings in Fig. A & B. If connecting - Kenmore 4812 | Installation Instructions - Page 9
block. KEEP the ground screw, ground plate and go to Step 4. 4. (4-Wire Permanent Connection ONLY} Connectthe ground wire lead (Green) to the frame of the appliance using the ground screw & plate as shown in Fig. 36. Be sure to install using the same hole in the frame where the ground screw - Kenmore 4812 | Installation Instructions - Page 10
testing of the appliance shall be conducted according to the instructions in Step connecting gas supply to range, review the suggested power source location Install an external gas Shut-Off Valve (manual) to gas supply line in an easily-accessible receptacle. Before servicing, disconnect electrical - Kenmore 4812 | Installation Instructions - Page 11
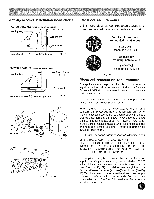
FULLY ENGAGING THE ANTI-TIP BRACKET (See Fig. 26). Make sure that the flexible appliance conduit (Fig. 18) and the power cord (Fig. 20) folds into the Heads and Burner Skirts. 1. Be sure to follow the Installation Instructions before installing and using your new range. 2. Remove all packing tape - Kenmore 4812 | Installation Instructions - Page 12
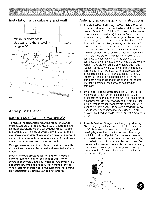
instructions for proper anti-tip anchoring instructions. Before you call for service Refer to the Use & Care Guide for cleaning instructions lower panel area (See Fig. 41). When ordering parts for or making inquires about your range, always be sure appliance. Alternate location may be under cooktop.
-
 1
1 -
 2
2 -
 3
3 -
 4
4 -
 5
5 -
 6
6 -
 7
7 -
8
-
9
-
10
-
11
-
12
 |
 |

iNSTALLATiON
AND
SERVICE
MUST
BE
PERFORMED
BY
A QUALIFIED
iNSTALLER.
iMPORTANT:
SAVE
FOR
LOCAL
ELECTRICAL
iNSPECTOR'S
USE.
READ
AND
SAVE
THESE
iNSTRUCTiONS
FOR
FUTURE
REFERENCE.
• ALL
RANGES
CAN
TiP
•
INJURYTO
PERSONS
COULD
RESULT
•
iNSTALL
ANTi=TIP
DEVICE
PACKED
WiTH
RANGE
•
SEE
iNSTALLATiON
iNSTRUCTiONS
I_
if
the
information
in
this
I
manual
is
not
followed
exactly,
a fire
or
I
explosion
may
result
causing
property
I
damage,
personal
injury
or death,
j
FOR YOUR
SAFETY:
m
Do not store or use
gasoline
or other
flammable
vapors
and liquids
in the
vicinity
of
this
or
any
other
appliance.
=
WHAT
TO DO iF YOU
SMELL
GAS:
•
Do not try
to
light any appliance.
•
Do
not
touch
any
electrical
switch;
do
not
use
any
phone
in
your
building.
•
Immediately
call your
gas
supplier
from
a neighbor's
phone.
Follow
the gas
supplier's
instructions.
•
if
you
cannot
reach
your
gas
supplier,
call
the
fire
department.
=
Installation
and
service
must
be
performed
by
a qualified
installer,
service
agency
or
the
gas
supplier.
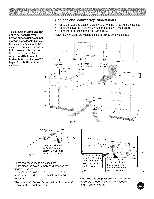
Clearances
and
Dimensions
Location:
Check location where
the
range will be
installed. Check
for
proper
electrical
and
gas
supply,
and
the
stability of
the
floor.
Dimensions
that
are shown
must
be used. Given
dimensions
provide
minimum
clearance.
Contact
surface must be solid
and
level.
Refer to
your
serial
plate for applicable
agency certifications
Provide
Proper
Fuel Type
Before
Proceeding:
Your
range
is preset
to
operate
on
Natural Gas only.
important
Note
to the
Consumer
= Keep these
instructions
with your Use & Care Guide
for
future reference.
= As when using any appliance
generating
heat, there are
certain
safety precautions
you should follow.
These are
listed in the Use & Care
Guide., read
it
carefully.
•
Be sure your range
is
installed and grounded
properly
by a qualified
installer
or service technician.
Make sure the wall coverings
around the range can
withstand
the heat generated
by the range.
To eliminate
the need to reach over the surface
elements
or burners, cabinet
storage space directly
above the range should be avoided.
important
Notes
to the
installer
= Read all instructions
contained
in these installation
instructions
before installing range.
Remove all packing
material from the oven
compartments
before connecting
the gas and electrical
supply to the range.
Observe all governing
codes and ordinances.
Be sure to leave these instructions
with the consumer.
48-1/2"
maximum
36+1/8 ''
f
.....
\
door
closed
maximum
door
pin 316454913
EspaSol-
Paginas
13-24