Kenmore 75180 Owners Manual - Page 6
How To Install
 |
View all Kenmore 75180 manuals
Add to My Manuals
Save this manual to your list of manuals |
Page 6 highlights
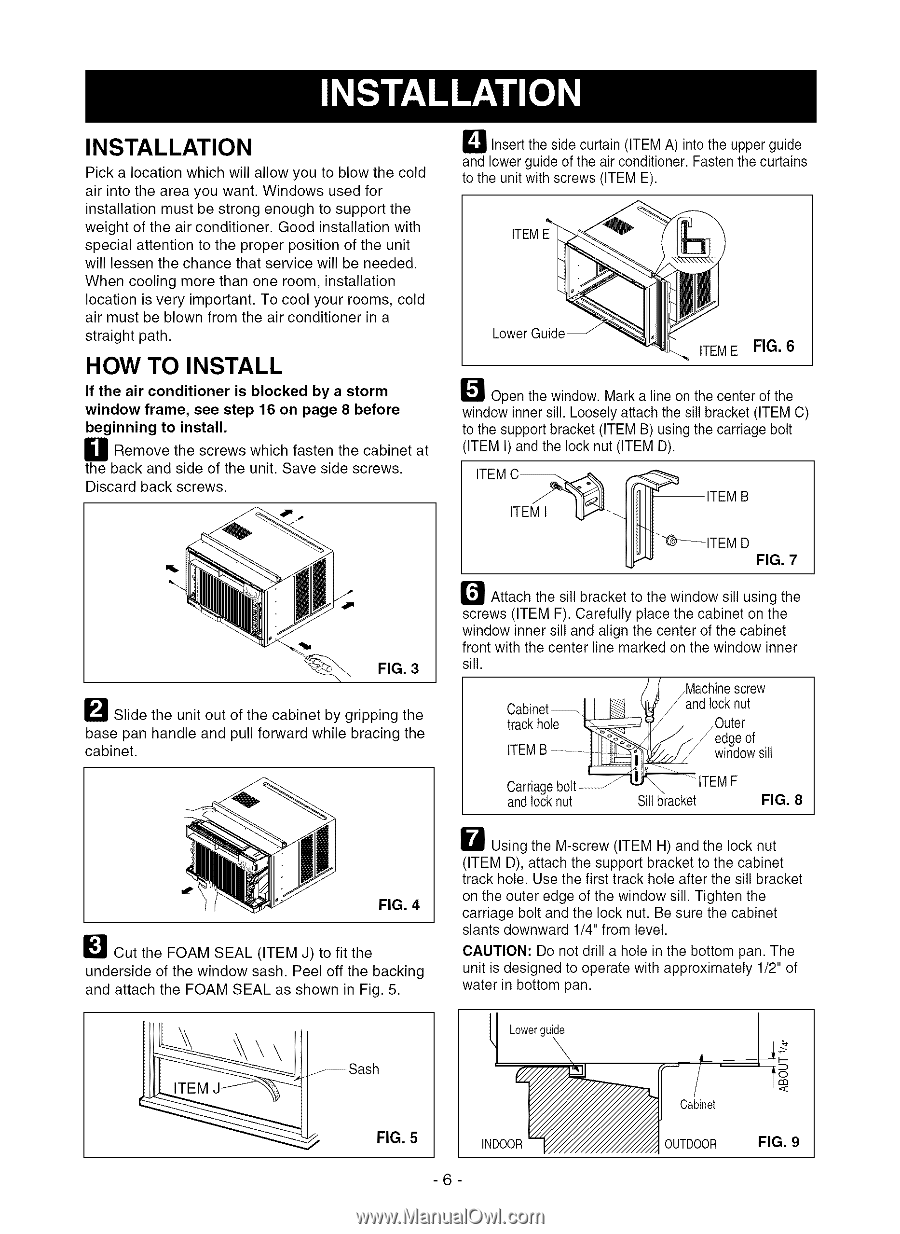
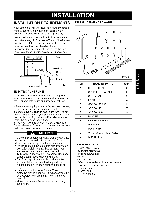
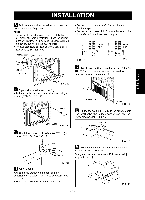
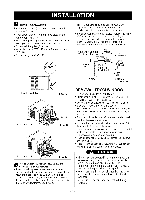
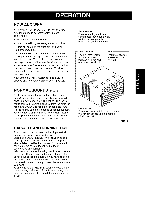
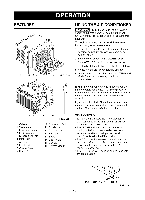
INSTALLATION Pick a location which will allow you to blow the cold air into the area you want. Windows used for installation must be strong enough to support the weight of the air conditioner. Good installation with special attention to the proper position of the unit will lessen the chance that service will be needed. When cooling more than one room, installation location is very important. To cool your rooms, cold air must be blown from the air conditioner in a straight path. HOW TO INSTALL If the air conditioner is blocked by a storm window frame, see step 16 on page 8 before beginning to install. H Remove the screws which fasten the cabinet at the back and side of the unit. Save side screws. Discard back screws. I_1 Insert the side curtain (ITEM A) into the upper guide and lower guide of the air conditioner. Fasten the curtains to the unit with screws (ITEM E). Lower Guide_ _ ITEME FIG. 6 _Open the window. Mark a line on the center of the window inner sill. Loosely attach the sill bracket (ITEM C) to the support bracket (ITEM B) using the carriage bolt (ITEM I) and the lock nut (ITEM D). ITEM ITEM I ' /.. FIG. 3 I_'_ Slide the unit out of the cabinet by gripping the base pan handle and pull forward while bracing the cabinet. r'_ Attach the sill bracket to the window sill using the screws (ITEM F). Carefully place the cabinet on the window inner sill and align the center of the cabinet front with the center line marked on the window inner sill. Cabinet_ track hole ITEM /Machine screw /and locknut ,Outer /edge of windowsill , / Carriagebolt and lock nut Sillbracket FIG. 8 FIG. 4 I_'! Cut the FOAM SEAL (ITEM J) to fit the underside of the window sash. Peel off the backing and attach the FOAM SEAL as shown in Fig. 5. H Using the M-screw (ITEM H) and the lock nut (ITEM D), attach the support bracket to the cabinet track hole. Use the first track hole after the sill bracket on the outer edge of the window sill. Tighten the carriage bolt and the lock nut. Be sure the cabinet slants downward 1/4" from level. CAUTION: Do not drill a hole in the bottom pan. The unit is designed to operate with approximately 1/2" of water in bottom pan. z Sash Lowerguide FIG. 5 -6- INDOOR Cabinet OUTDOOR FIG. 9
-
 1
1 -
 2
2 -
 3
3 -
 4
4 -
 5
5 -
 6
6 -
 7
7 -
 8
8 -
 9
9 -
 10
10 -
 11
11 -
 12
12 -
13
-
14
-
15
-
16
-
17
-
18
-
19
-
20
-
21
-
22
-
23
-
24
-
25
-
26
-
27
-
28
-
29
-
30
-
31
-
32
-
33
-
34
-
35
 |
 |