Kenmore 7901 Use and Care Guide - Page 15
Leveling, Closing
 |
View all Kenmore 7901 manuals
Add to My Manuals
Save this manual to your list of manuals |
Page 15 highlights
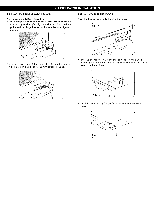
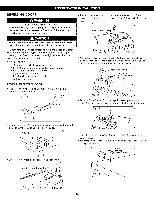
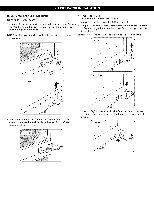
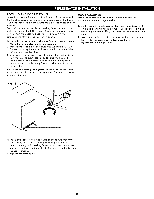
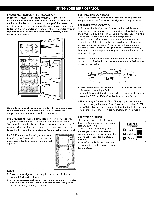
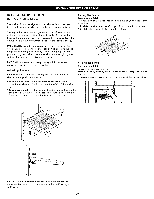
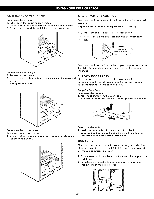
LEVELING AND DOOR CLOSING To avoid vibration_ the unit must be leveled. If necessary adiust the Leveling Legs to compensate for unevenness of the floor. The front should be slightly higher than the rear to aid in door closing. Your refrigerator has two Front Leveling Screws - one on the right and one on the left. If your refrigerator seems unsteady or you want the doors to close more easily_ adjust the refrigerator's flit using the instruction below: 1. Plug refrigerator power cord into a 3-prong grounded outlet. Move the refrigerator into its final position. 2. Remove the base grille. See BASE GRILLE iNSTRUCTiONS. The two Leveling Screws are located on the bottom of the refrigerator on either side. 3. Insert a flat screwdriver in slots to adjust the Leveling Screws. Turn the leveling screw clockwise to raise the side of the refrigerator or counterclockwise to lower it. It may take several turns of the Leveling Screw to adjust the tilt of the refrigerator. NOTE: Having some push against the top of the refrigerator takes some weight off the Leveling Screws. This make it easier to adjust the screws. DOOR ALIGNMENT If the space between your doors is uneven_ follow the instructions below to align the doors. 1. Gently pry off: the refrigerator door Top Hinge Cover with a fiat head screwdriver and remove. Loosen the Top Hinge Bolts using a lOmm or ]3/3 2 -in. Socket wrench or open-end wrench. 2. Have someone hold the freezer door so the space between the two door is even_ and the top hinge bolts. 3. Replace the Top Hinge Cover. Fig. 38 4.0pen both doors again and check to make sure that they close easily. If not, tilt the refrigerator slightly more to the rear by turning both Leveling Screws clockwise. It may take several more turns_ and you should turn both Leveling Screws the same amount. 5. Replace the base grille. 16
-
 1
1 -
2
-
3
-
4
-
5
-
6
-
7
-
8
-
9
-
 10
10 -
 11
11 -
 12
12 -
 13
13 -
 14
14 -
 15
15 -
 16
16 -
 17
17 -
 18
18 -
 19
19 -
 20
20 -
21
-
22
-
23
-
24
-
25
-
26
-
27
-
28
-
29
-
30
-
31
-
32
 |
 |
