Kenmore 9802 Installation Instructions - Page 4
Leveling, Range, Installation, instructions, Checking
 |
View all Kenmore 9802 manuals
Add to My Manuals
Save this manual to your list of manuals |
Page 4 highlights
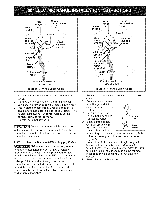
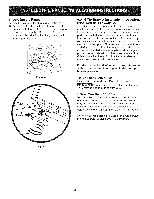
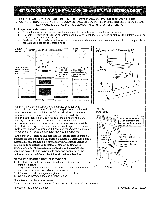
8. Leveling the Range A. Install an oven rack in the center of the oven. B. Place a level on the rack (see Figure 4). Take 2 readings with the level placed diagonally in one direction and then the other. Level the range, if necessary, by adjusting the 4 leg levelers with a wrench (see Figure 5). Figure 4 9.Anti-Tip Bracket Installation instructions iMPORTANT SAFETY WARNING To reduce the risk of tipping of the range, the range must be secured to the floor by properly installed antitip bracket and screws packed with the range. These parts are located in a plastic bag in the oven. Failure to install the anti-tip bracket will allow the range to tip over if excessive weight is placed on an open door or if a child climbs upon it. Serious injury may result from spilled hot liquids or from the range itself. Refer to the instructions located in the anti-tip bracket package for proper bracket installation. If the range is moved to a different location, the anti-tip bracket must also be moved and installed with the range. For the bracket installation intructions, refer to the anti-tip bracket template shipped in the anti=tip bracket package. 10. Checking Operation Refer to the Use and Care Guide for operation. _Do not touch cooktop glass or elements. They may be hot enough to burn you. Before You Call for Service Read the Before You Call for Service Checklist and operating instructions in your Use and Care Guide. It may save you time and expense. The list includes common occurrences that are not the result of defective workmanship or materials in this appliance. Refer to your Use and Care Guide for Sears service phone numbers, or call 1=800=4=MY=HOME ®. Figure 5 4
-
 1
1 -
 2
2 -
 3
3 -
 4
4 -
 5
5 -
 6
6 -
 7
7 -
 8
8
 |
 |
