Kenwood DDX418 Instruction Manual - Page 6
Component names and functions - rear usb
 |
UPC - 019048192493
View all Kenwood DDX418 manuals
Add to My Manuals
Save this manual to your list of manuals |
Page 6 highlights
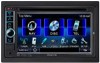
Component names and functions Screen (touch panel) Monitor panel 1 Loading slot 2 0 (Eject) button Ejects the disc. 3 Remote sensor 4 Reset button/Power indicator/Security indicator • Resets the unit. (☞ page 3) • Lights up while the unit is turned on. • Flashes when the security function is activated. (☞ page 5) 5 MENU/ button • Turns off the power. (Hold) • Turns on the power. (Press) • Displays screen. (Press) (☞ page 9) 6 AV/AV OUT button • Displays the current source screen. (Press) • Selects the AV source for external monitor or amplifier. (Hold) 7 For DDX418/DDX4048BT: TEL/V.OFF button • Displays the screen. (Press) (☞ page 40) • Turns off/on the screen. (Hold) (☞ page 8) For DDX318/DDX3048: AUD/V.OFF button • Displays screen. (Press) (☞ page 28) • Turns off/on the screen. (Hold) (☞ page 8) 8 Volume adjustment knob. (☞ page 8) • Attenuates the sound. (Press) • Adjusts the audio volume. (Turn) For DDX418/DDX4048BT only: AUD button • Displays screen. (Hold) (☞ page 28) 9 FNC/R-CAM button • Displays the source control screen. (Press) (☞ page 9) • Displays the picture from the rear view camera. (Hold) p USB input terminal q AV-IN input terminal Caution on volume setting: Digital devices (CD/USB) produce very little noise compared with other sources. Lower the volume before playing these digital sources to avoid damaging the speakers by sudden increase of the output level. 6 DDX418/DDX4048BT/DDX318/DDX3048 You can change the color of the buttons on the monitor panel. (☞ page 30)
-
 1
1 -
 2
2 -
 3
3 -
 4
4 -
 5
5 -
 6
6 -
 7
7 -
 8
8 -
 9
9 -
 10
10 -
 11
11 -
 12
12 -
13
-
14
-
15
-
16
-
17
-
18
-
19
-
20
-
21
-
22
-
23
-
24
-
25
-
26
-
27
-
28
-
29
-
30
-
31
-
32
-
33
-
34
-
35
-
36
-
37
-
38
-
39
-
40
-
41
-
42
-
43
-
44
-
45
-
46
-
47
-
48
-
49
-
50
-
51
-
52
-
53
-
54
-
55
-
56
-
57
-
58
-
59
-
60
-
61
-
62
-
63
-
64
 |
 |
