Kenwood DPX-5000BT Operation Manual 1 - Page 38
Dab Ant Power
 |
View all Kenwood DPX-5000BT manuals
Add to My Manuals
Save this manual to your list of manuals |
Page 38 highlights
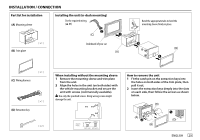
INSTALLATION / CONNECTION 4 Rub the film antenna gently onto the windscreen in the direction of the arrow shown to allow it to stick firmly. (F) 5 Remove the separator (tag 2) of film antenna (F) vertically. Separator (tag 2) (F) 6 Set the postion of the protrusion of the amplifier unit (G) with the K on the film antenna (F) and paste. Do not touch the lead terminal or the pasting surface (adhesive side) of the amplifier unit (G). • When installing the antenna on the right side (G) Earth sheet (F) Set the position of the protrusion with K mark Lead terminal of the film antenna (F) Lead contact of the amplifier unit (metal part) • When installing the antenna on the left side 7 Remove the film covering the earth sheet and paste the earth sheet on the metal part of the vehicle. Provide sufficient leeway for the earth sheet so that it does not interfere with the interior parts (front pillar cover). Also take care that the interior parts do not interfere with the amplifier unit (G). Windscreen Earth sheet (G) Front pillar cover 8 Wire the antenna cables. Use cable clamper (H) to secure the antenna to the pillar at several positions. 9 Attach the front pillar cover back to its original position. Be sure not to damage the earth sheet and amplifier unit (G) when covering. 10 Connect the amplifier unit (G) to the DAB input terminal on the rear of the unit. 11 Set [DAB ANT POWER] to [ON]. ( 5) Earth sheet (F) (G) 34
-
 1
1 -
2
-
3
-
4
-
5
-
6
-
7
-
8
-
9
-
10
-
11
-
12
-
13
-
14
-
15
-
16
-
17
-
18
-
19
-
20
-
21
-
22
-
23
-
24
-
25
-
26
-
27
-
28
-
29
-
30
-
31
-
32
-
 33
33 -
 34
34 -
 35
35 -
 36
36 -
 37
37 -
 38
38 -
 39
39 -
 40
40 -
 41
41 -
 42
42 -
 43
43 -
44
-
45
-
46
-
47
-
48
-
49
-
50
-
51
-
52
-
53
-
54
-
55
-
56
-
57
-
58
-
59
-
60
-
61
-
62
-
63
-
64
-
65
-
66
-
67
-
68
-
69
-
70
-
71
-
72
-
73
-
74
-
75
-
76
-
77
-
78
-
79
-
80
-
81
-
82
-
83
-
84
-
85
-
86
-
87
-
88
-
89
-
90
-
91
-
92
-
93
-
94
-
95
-
96
-
97
-
98
-
99
-
100
-
101
-
102
-
103
-
104
-
105
-
106
-
107
-
108
-
109
-
110
-
111
-
112
-
113
-
114
-
115
-
116
-
117
-
118
-
119
-
120
-
121
-
122
-
123
-
124
-
125
-
126
-
127
-
128
-
129
-
130
-
131
-
132
-
133
-
134
-
135
-
136
-
137
-
138
-
139
-
140
-
141
-
142
-
143
-
144
 |
 |
