Kenwood DPX-MP4070B User Manual - Page 12
Adjustment of Equalizer type at PRO, Memory preset of adjustment of, Equalizer type, Movie Select
 |
View all Kenwood DPX-MP4070B manuals
Add to My Manuals
Save this manual to your list of manuals |
Page 12 highlights
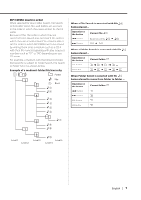
General features Adjustment of Equalizer type at PRO Adjusting the effect of an Equalizer type selected in 'Equalizer Control' when 'Equalizer mode' is "PRO". 1 Refer to 'Equalizer Control' (page 11) to select the Equalizer type. 2 Select the item for adjustment Press the [FM+] or [AM-] button. Each time the button is pressed, the items that can be adjusted switch as shown below. 3 Adjust the item Press the [4] or [¢] button. Adjustment Item Bass Center Frequency Bass level Bass Q Factor Bass Extend Middle Center Frequency Middle level Middle Q Factor Treble Center Frequency Treble level Display "BasF" "BasLV" "BasQ" "EXT" "MidF" "MidLV" "MidQ" "TreF" "TreLV" Range 60/70/80/100 or 150 Hz -12 - +12 1.00/1.25/1.50/2.00 ON/OFF 0.5/1.0/1.5/2.0 kHz -12 - +12 1.0/2.0 10.0/12.5/15.0/17.5 kHz -12 - +12 • According to the Bass Q Factor setting value, the frequencies that can be set in Bass Center Frequency change as shown below. Bass Q Factor 1.00/1.25/1.50 2.00 Bass Center Frequency 60/70/80/100 60/70/80/150 • When the Bass Extend is set to ON, low frequency response is extended by 20%. 4 Exit the Equalizer Control mode Press the [EQ] button for at least 1 second. When operation stops for 10 seconds, the Equalizer type at that time is registered and the Equalizer Control mode automatically closes. Memory preset of adjustment of Equalizer type The 'Adjustment of Equalizer type at PRO' can be preset. 1 Refer to 'Adjustment of Equalizer type at PRO' (page 12) to adjust the Equalizer type. 2 Preset the adjusted value Press the [1] - [3] button for at least 1 second. Recalling a setting value 1 Enter the Equalizer Control mode Press the [EQ] button. "EQ PRO" is displayed. • If "EQ EASY" is displayed, refer to 'Equalizer mode' (page 24) to set the mode to "EQ PRO". 2 Recall the setting value Press the [1] - [3] button. Movie Select Selecting the Movie display. 1 Enter the Movie Select mode Press the [MOVIE] button for at least 1 second. "Movie" is displayed. 2 Select the Movie Press the [MOVIE] button. Each time the button is pressed, the Movie switch as shown below: Movie Scan of Movie Movie 1 Movie 2 Movie 3 Movie 4 Movie 5 Movie 6 Movie 7 Movie 8 OFF Display "MovieScn" "Movie 1" "Movie 2" "Movie 3" "Movie 4" "Movie 5" "Movie 6" "Movie 7" "Movie 8" "MovieOff" 12 | English
-
 1
1 -
2
-
3
-
4
-
5
-
6
-
 7
7 -
 8
8 -
 9
9 -
 10
10 -
 11
11 -
 12
12 -
 13
13 -
 14
14 -
 15
15 -
 16
16 -
 17
17 -
18
-
19
-
20
-
21
-
22
-
23
-
24
-
25
-
26
-
27
-
28
-
29
-
30
-
31
-
32
-
33
-
34
-
35
-
36
-
37
-
38
-
39
-
40
-
41
-
42
-
43
-
44
-
45
-
46
-
47
-
48
-
49
-
50
-
51
-
52
-
53
-
54
-
55
-
56
-
57
-
58
-
59
-
60
-
61
-
62
-
63
-
64
-
65
-
66
-
67
-
68
-
69
-
70
-
71
-
72
-
73
-
74
-
75
-
76
-
77
-
78
-
79
-
80
-
81
-
82
-
83
-
84
-
85
-
86
-
87
-
88
-
89
-
90
-
91
-
92
-
93
-
94
-
95
-
96
-
97
-
98
-
99
-
100
-
101
-
102
-
103
-
104
-
105
-
106
-
107
-
108
 |
 |
