Kenwood DT-7000S Instruction Manual - Page 6
Controls, and Features - remote
 |
UPC - 019048150417
View all Kenwood DT-7000S manuals
Add to My Manuals
Save this manual to your list of manuals |
Page 6 highlights
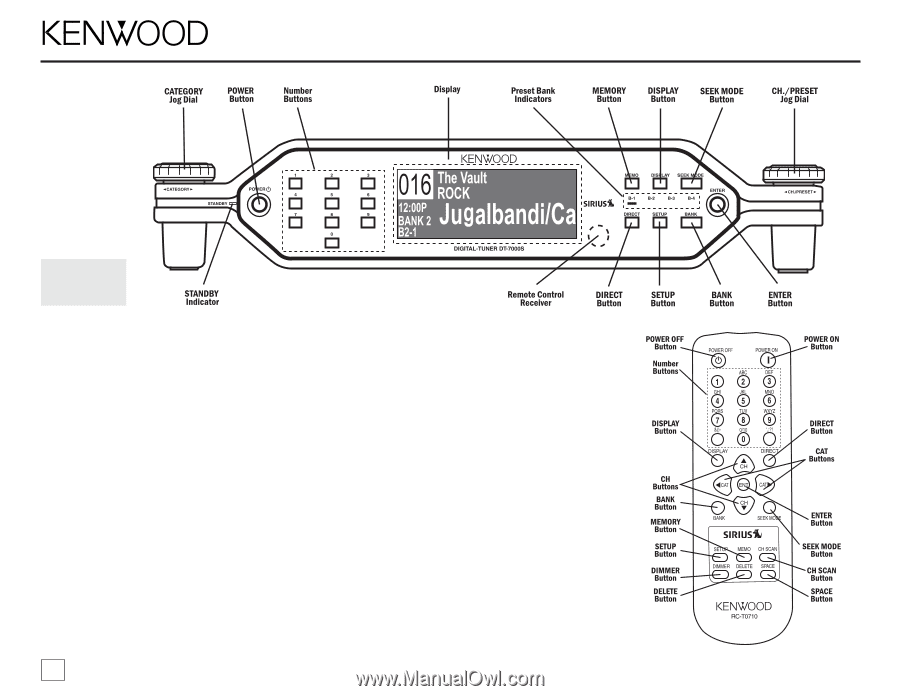
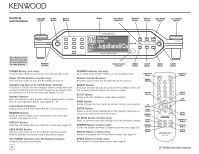
Controls and Features Note: Buttons on the unit and remote with the same name have the same function. POWER Button (unit only): Turns the DT-7000S on and puts it into the Standby mode. Power Off/On Buttons (remote only): Emit discrete codes to turn the DT-7000S off and on. Category Jog Dial (unit)/CAT Buttons (remote): Puts the DT-7000S into the Category Select tuning mode and accesses different entertainment categories; accesses different selections in the Setup mode (see pages 7 & 10). Number Buttons: Sets and selects stream presets; selects alphanumeric characters for naming Preset Banks (see pages 8 - 9). Preset Bank Indicators: Shows which of the four Preset Banks is currently active. MEMORY Button: Saves & recalls song & artist information; sets Lock Code number (see pages 9 & 12). DISPLAY Button: Switches the display between different modes (see page 10). SEEK MODE Button: Switches the action of the CH./PRESET Jog Dial and CH Buttons between the Stream and Preset seek modes. CH./PRESET Jog Dial (unit)/CH Buttons (remote): Accesses Streams and Presets. STANDBY Indicator (unit only): Illuminates when the DT-7000S is in the Standby mode. Remote Control Receiver: Receives signals from the included IR remote control. DIRECT Button: Accesses streams directly by number: Press DIRECT, then use the number buttons to enter the stream number. SETUP Button: Enters and exits the Setup mode (see page 10). BANK Button: Cycles-through the four banks of stream presets (see page 8). ENTER Button: Press to select items highlighted on the display; hold-down to jump to the previously-received stream. CH SCAN Button (remote only): Press to automatically scan through all of the available streams. DIMMER Button (remote only): Cycles the display between 3 brightness levels (see page 10). DELETE Button (remote only): Deletes characters from Preset Bank names (see page 9). SPACE Button (remote only): Puts spaces in Preset Bank names (see page 9). 6 DT-7000S Instruction Manual
-
 1
1 -
 2
2 -
 3
3 -
 4
4 -
 5
5 -
 6
6 -
 7
7 -
 8
8 -
 9
9 -
 10
10 -
 11
11 -
 12
12 -
13
-
14
-
15
-
16
 |
 |