Kenwood KNA-L50 Instruction Manual - Page 48
Installing the unit, Supplied accessories for, installation, Installation procedure
 |
View all Kenwood KNA-L50 manuals
Add to My Manuals
Save this manual to your list of manuals |
Page 48 highlights
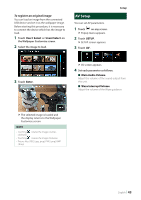
Connection/Installation ÑÑSupplied accessories for installation 1 (3 m) x1 2 (3.5 m) x1 3 Installing the unit ÑÑSecuring to audio board 1) Mount the brackets (accessory 6) to this unit using screws (accessory 4). 2) Secure this unit to the vehicle (audio board, etc.) using screws (accessory 5). 5 6 x1 4 (M4 x 6 mm) x4 5 (Ø4 x 16 mm) x4 6 x1 ÑÑInstallation procedure 1) To prevent a short circuit, remove the key from the ignition and disconnect the ¤ terminal of the battery. 2) Make the proper input and output wire connections for each unit. 3) Connect the wire on the wiring harness. 4) Connect the wiring harness connector to the unit. 5) Install the unit in your car. 6) Reconnect the ¤ terminal of the battery. 7) Perform the Initial Setup. See Initial setup (P.8). 4 Carpet Board etc. thickness: 20 mm or more NOTE • When installing to the car, the unit should be securely fastened at a location that will not interfere with driving. • When making a hole in the chassis, check that the gas tank, break pipe, wire harness, or other part is not located on the other side, and be careful not to cause scratches. 48
-
 1
1 -
2
-
3
-
4
-
5
-
6
-
7
-
8
-
9
-
10
-
11
-
12
-
13
-
14
-
15
-
16
-
17
-
18
-
19
-
20
-
21
-
22
-
23
-
24
-
25
-
26
-
27
-
28
-
29
-
30
-
31
-
32
-
33
-
34
-
35
-
36
-
37
-
38
-
39
-
40
-
41
-
42
-
 43
43 -
 44
44 -
 45
45 -
 46
46 -
 47
47 -
 48
48 -
 49
49 -
 50
50 -
 51
51 -
 52
52 -
 53
53 -
54
-
55
-
56
-
57
-
58
-
59
-
60
 |
 |
