Kenwood TH-F6A User Manual - Page 6
Preparation
 |
View all Kenwood TH-F6A manuals
Add to My Manuals
Save this manual to your list of manuals |
Page 6 highlights
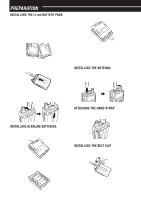
PREPARATION INSTALLING THE Li-ion BATTERY PACK Note: Because the battery pack is provided uncharged, you must charge the battery pack before using it with the transceiver. To charge the battery pack, refer to "CHARGING THE Li-ion BATTERY PACK" {page 2}. 1 Position the two grooves on the edge and two hooks at the bottom of the battery pack over the corresponding guides on the back of the transceiver. Grooves 2 Slide the battery pack along the back of the transceiver until the release latch on the top of the transceiver locks the battery pack in place. 3 Align the two tabs on the battery case cover, then close the cover until the locking tabs click. Tabs 4 To install the battery case onto (or remove it from) the transceiver, follow steps 1 to 3 of "INSTALLING THE Li-ion BATTERY PACK" {above}. Note: When you use the alkaline batteries, access Menu No. 30 (BATTERY), then select "ALKALINE". Otherwise, the battery remaining cannot be measured correctly {page 36}. INSTALLING THE ANTENNA Hold the base of the supplied antenna, then screw the antenna into the connector on the top panel of the transceiver until secure. 3 To remove the battery pack, push the release latch on top, then slide the battery pack down. Latch a ATTACHING THE HAND STRAP If desired, you can attach the supplied hand strap to the transceiver. INSTALLING ALKALINE BATTERIES 1 To open the battery case (BT-13), push the locking tab in, then pull the cover back. Tab 2 Insert (or remove) four AA (LR6) alkaline batteries. • Be sure to match the battery polarities with those marked in the bottom of the battery case. Strap INSTALLING THE BELT CLIP You can install the supplied belt clip to the transceiver tightening the 2 supplied screws. Screws 1
-
 1
1 -
 2
2 -
 3
3 -
 4
4 -
 5
5 -
 6
6 -
 7
7 -
 8
8 -
 9
9 -
 10
10 -
 11
11 -
 12
12 -
13
-
14
-
15
-
16
-
17
-
18
-
19
-
20
-
21
-
22
-
23
-
24
-
25
-
26
-
27
-
28
-
29
-
30
-
31
-
32
-
33
-
34
-
35
-
36
-
37
-
38
-
39
-
40
-
41
-
42
-
43
-
44
-
45
-
46
-
47
-
48
-
49
-
50
-
51
-
52
-
53
-
54
-
55
-
56
-
57
-
58
-
59
-
60
-
61
-
62
-
63
-
64
 |
 |
