Kenwood XD-551 User Manual - Page 54
Clock adjustment
 |
View all Kenwood XD-551 manuals
Add to My Manuals
Save this manual to your list of manuals |
Page 54 highlights
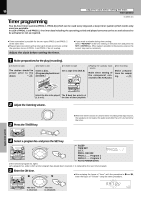
54 Clock adjustment This unit incorporates a clock function. Be sure to adjust the correct time before using the timer function. The time is displayed only while the power is off. Adjust the clock before setting the timer. XD-SERIES (En) Preparation section 1 Activate the clock adjustment mode. TIMER 2 Select "TIME SET". 1 MULTI CONTROL 2 Press the SET key. SET 3 Enter the figure of hour. 1 MULTI CONTROL To decrease the figure 2 Press the SET key. SET To increase the figure 4 Enter the figure of minute. 1 MULTI CONTROL To decrease the figure 2 Press the ENTER key. To increase the figure ENTER SLEEP TIME SET O.T.T. PROG. ON/OFF PROG. 1 PROG. 2 AUTO POWER SAVE sET CLOC K ÷ The time display starts to blink. AM12 O0 Example: Adjustment to 8:45 AM 8 O0 AM12ÔAM1ÔAM2...PM1ÔPM2...ÔRETURNÔAM12... ÷ The time of the day is represented in 12-hour AM/PM method. ÷ Press the SET key. The hour is entered and the minute display starts to blink. AM 8 45 00Ô01Ô02...59ÔRETURNÔ00Ô01... ÷ If you made a mistake, select "RETURN" and press the ENTER key and restart the entry. ÷ To adjust correct time, press the ENTER key at the same moment as a time announcement. ÷ The display appears after a power failure or when the power cord has been unplugged from the AC outlet and plugged again. In such a case, adjust the clock again. Application section Knowledge sections
-
 1
1 -
2
-
3
-
4
-
5
-
6
-
7
-
8
-
9
-
10
-
11
-
12
-
13
-
14
-
15
-
16
-
17
-
18
-
19
-
20
-
21
-
22
-
23
-
24
-
25
-
26
-
27
-
28
-
29
-
30
-
31
-
32
-
33
-
34
-
35
-
36
-
37
-
38
-
39
-
40
-
41
-
42
-
43
-
44
-
45
-
46
-
47
-
48
-
 49
49 -
 50
50 -
 51
51 -
 52
52 -
 53
53 -
 54
54 -
 55
55 -
 56
56 -
 57
57 -
 58
58 -
 59
59 -
60
-
61
-
62
-
63
-
64
 |
 |
