KitchenAid KECC562GBL Use and Care Manual - Page 11
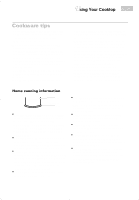
Cookware tips
 |
View all KitchenAid KECC562GBL manuals
Add to My Manuals
Save this manual to your list of manuals |
Page 11 highlights
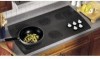
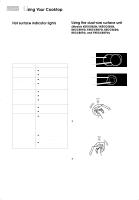
Using Your Cooktop Cookware tips • Select a pan that is about the same size as the surface cooking area. Cookware should not extend more than 1 inch (2.5 cm) outside the area. • For best results and greater energy efficiency, use only flat-bottomed cookware that makes good contact with the surface cooking area. Cookware with rounded, warped, ribbed (such as some porcelain enamelware), or dented bottoms could cause uneven heating and poor cooking results. • Cookware designed with slightly indented bottoms or small expansion channels can be used. • Cookware with non-stick finish has heating characteristics of the base material. • Check for rough spots on the bottom of metal or glass cookware which will scratch the ceramic glass surface. • Use flat bottom cookware for best heat conduction from the surface cooking area to the cookware. Determine flatness with the ruler test. Place the edge of a ruler across the bottom of the cookware. Hold it up to the light. No light should be visible under the ruler. Rotate the ruler in all directions and look for any light. • Do not leave empty cookware, or cookware that has boiled dry, on a hot surface cooking area. The cookware could overheat, causing damage to the cookware or the surface cooking area. Home canning information Center over surface unit Pan Surface unit • Use the entire surface ("DUAL" setting) of the left front surface cooking area for best results. (Models KECC502G, YKECC502G, KECC507G, YKECC507G, KECC508G, YKECC508G, KECC562G, KECC567G, YKECC567G, KECC568G, YKECC568G) • Use flat-bottomed canners on all types of cooktops, especially ceramic glass. Canners with rippled or ridged bottoms do not allow good contact with the surface. • Center the canner over the largest surface cooking area. Do not extend more than one inch outside the surface cooking area. Large diameter canners/pans, if not centered correctly, trap heat and can cause damage to the cooktop. • Do not place your canner on two surface cooking areas at the same time. • The type of material the canner is made of determines the length of heating time. Refer to the "Characteristics of cookware materials" chart later in this section for more information. • When canning for long periods of time, allow elements and the surrounding surfaces to cool down. • Alternate use of the surface cooking areas between batches or prepare small batches at a time. • Start with hot water, cover with a lid, and bring to a boil; then reduce heat to maintain a boil or required pressure levels in a pressure canner. • For up-to-date information on canning, contact your local U.S. Government Agricultural Department Extension Office or companies who manufacture home canning products. 11
-
 1
1 -
2
-
3
-
4
-
5
-
 6
6 -
 7
7 -
 8
8 -
 9
9 -
 10
10 -
 11
11 -
 12
12 -
 13
13 -
 14
14 -
 15
15 -
 16
16 -
17
-
18
-
19
-
20
-
21
-
22
-
23
-
24
-
25
-
26
-
27
-
28
-
29
-
30
-
31
-
32
-
33
-
34
-
35
 |
 |
