KitchenAid KECD867XSS Installation Guide - Page 9
Installation Instructions
 |
UPC - 883049202457
View all KitchenAid KECD867XSS manuals
Add to My Manuals
Save this manual to your list of manuals |
Page 9 highlights
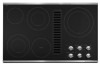
INSTALLATION INSTRUCTIONS Prepare Cooktop Decide on the final location for the cooktop. WARNING Excessive Weight Hazard Use two or more people to move and install cooktop. Failure to do so can result in back or other injury. Install Foam Strip 1. Remove foam strip from the package containing literature. 2. Remove backing from foam strip. 3. Apply foam strip adhesive-side down around bottom of cooktop, flush with edge. NOTE: The foam strip keeps the underside of the cooktop glass free from debris and helps the cooktop sit flat on uneven counters. A 1. Open product as instructed on product packaging. 2. Remove shipping materials and tape from cooktop. 3. Remove vent grille. A C B D A. Vent grille B. Plenum C. Removable grease filter D. Ceramic glass top 4. Remove the removable grease filter by lifting the filter out. 5. Using 2 or more people, remove the cooktop from the carton. 6. Use foam end caps from the packaging as a work surface for the floor or countertop. 7. Using 2 or more people, place the cooktop upside down on the foam end caps. 8. Make sure knobs are positioned in the open areas of the end caps. 9. Avoid placing the cooktop facedown on the control knobs. A. Cooktop base B. Foam strip C. Glass B C Rotate Blower - Optional IMPORTANT: The following additional steps must be performed if the product is being installed in peninsula or island cabinetry. The blower exhaust scroll is shipped from the factory set to exhaust straight out the back of the cabinet through an exterior wall. D E C E A B F A. Blower exhaust scroll B. Plenum C. Blower motor D. Top label E. 10-32 machine nuts (4) F. Motor mounting plate 9
-
 1
1 -
2
-
3
-
 4
4 -
 5
5 -
 6
6 -
 7
7 -
 8
8 -
 9
9 -
 10
10 -
 11
11 -
 12
12 -
 13
13 -
 14
14 -
15
-
16
-
17
-
18
-
19
-
20
-
21
-
22
-
23
-
24
 |
 |
