KitchenAid KP26M1XDP Use & Care Guide - Page 9
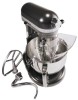
Assembling Your Bowl Lift Mixer
 |
UPC - 050946970219
View all KitchenAid KP26M1XDP manuals
Add to My Manuals
Save this manual to your list of manuals |
Page 9 highlights
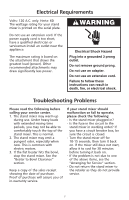
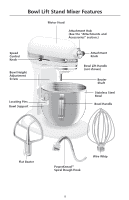
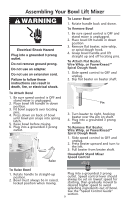
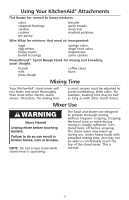
Assembling Your Bowl Lift Mixer Electrical Shock Hazard Plug into a grounded 3 prong outlet. Do not remove ground prong. Do not use an adapter. Do not use an extension cord. Failure to follow these instructions can result in death, fire, or electrical shock. To Lower Bowl 1. Rotate handle back and down. To Remove Bowl 1. Be sure speed control is OFF and stand mixer is unplugged. 2. Place bowl lift handle in down position 3. Remove flat beater, wire whip, or spiral dough hook. 4. Grasp bowl handle and lift straight up and off locating pins. To Attach Flat Beater, Wire Whip, or PowerKnead™ Spiral Dough Hook 1. Slide speed control to OFF and unplug. 2. Slip flat beater on beater shaft. To Attach Bowl 1. Be sure speed control is OFF and stand mixer is unplugged. 2. Place bowl lift handle in down position. 3. Fit bowl supports over locating pins. 4. Press down on back of bowl until bowl pin snaps into spring latch. 5. Raise bowl before mixing. 6. Plug into a grounded 3 prong outlet. Raise Pin 3. Turn beater to right, hooking beater over the pin on shaft. 4. Plug into a grounded 3 prong outlet. To Remove Flat Beater, Wire Whip, or PowerKnead™ Spiral Dough Hook 1. Slide speed control to OFF and unplug. 2. Press beater upward and turn to the left. 3. Pull beater from beater shaft. Household Stand Mixer Speed Control RESET OFF/0STIR To Raise Bowl 1. Rotate handle to straight-up position. 2. Bowl must always be in raised, locked position when mixing. Plug into a grounded 3 prong outlet. Speed control lever should always be set on lowest speed for starting, then gradually moved to desired higher speed to avoid splashing ingredients out of bowl. See the "Speed Control Guide" section. 9
-
 1
1 -
2
-
3
-
 4
4 -
 5
5 -
 6
6 -
 7
7 -
 8
8 -
 9
9 -
 10
10 -
 11
11 -
 12
12 -
 13
13 -
 14
14 -
15
-
16
-
17
-
18
-
19
-
20
-
21
-
22
-
23
-
24
-
25
-
26
-
27
-
28
-
29
-
30
-
31
-
32
-
33
-
34
-
35
-
36
-
37
-
38
-
39
-
40
-
41
-
42
-
43
-
44
-
45
-
46
-
47
-
48
-
49
-
50
-
51
-
52
-
53
-
54
-
55
-
56
-
57
-
58
-
59
-
60
-
61
-
62
-
63
-
64
-
65
-
66
-
67
-
68
-
69
-
70
-
71
-
72
-
73
-
74
-
75
-
76
-
77
-
78
-
79
-
80
-
81
-
82
-
83
-
84
-
85
-
86
-
87
-
88
 |
 |
