KitchenAid KUDE60HXSS Installation Guide - Page 15
Install Custom Panel
 |
UPC - 883049209944
View all KitchenAid KUDE60HXSS manuals
Add to My Manuals
Save this manual to your list of manuals |
Page 15 highlights
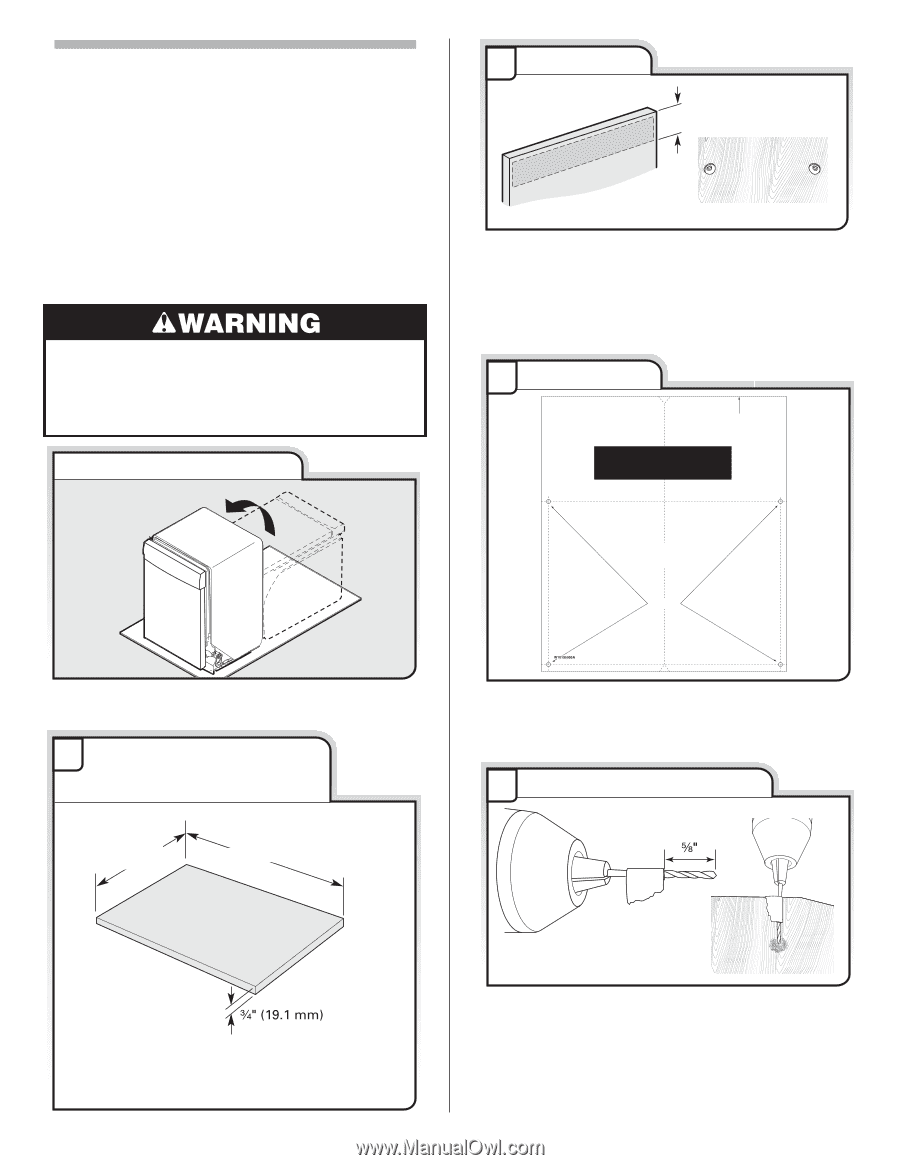
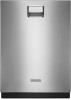
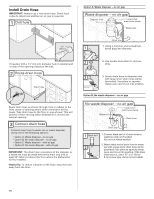
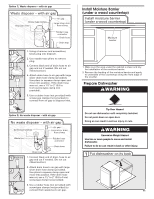
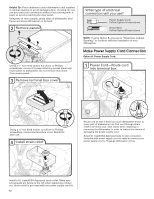
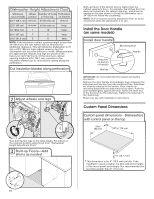
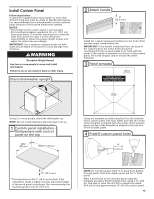
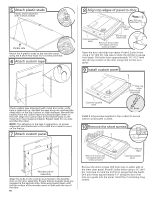
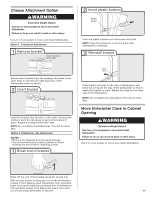
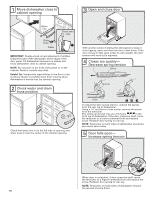
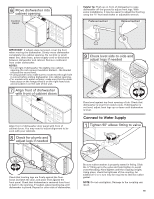
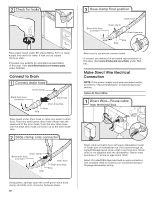
Install Custom Panel Follow steps below: A customer supplied panel must weigh no more than 16 lbs (7.3 kg) and must be made to specific dimensions. It is recommended that a cabinetmaker cut the customer panel because of the precise dimensions needed. NOTES: • The handle for the custom panel is not included. • All mounting hardware supplied is for a ³⁄₄" (19.1 cm) thick wood panel. If a thinner wood panel or materials other than wood are used, it is the customer's responsibility to obtain the proper length screws and adjust the pilot holes accordingly. IMPORTANT: Use a moisture resistant sealer on both sides and all edges of the panel to avoid damage from moisture. Excessive Weight Hazard Use two or more people to move and install dishwasher. Failure to do so can result in back or other injury. Stand dishwasher upright 2 Attach handle 6" (15.2 mm) Install the custom hardware handle(s) on the front of the wooden panel inside dotted line. IMPORTANT: If the handle is attached from the back of the custom panel, the screw holes should be countersunk for the screws heads to be flush with the panel. If the handle is attached to the front of the custom panel, the screw lengths cannot exceed the panel thickness. 3 Panel template Top Of Panel Tapa del panel Dessus de panneau WOOD PANEL TEMPLATE PLANTILLA DE MADERA DEL PANEL CALIBRE EN BOIS DE PANNEAU Centerline Línea central Axe central Pilot holes Using 2 or more people, stand the dishwasher up. NOTE: Do not install kickplate until instructed to do so. 1 Custom panel installation - Dishwashers with control panel on the top 23⁵⁄₈" (60 cm) *29 76 cm) Using the template provided attached it to the backside of the custom panel with tape. Make sure that the center of the template is aligned with the center of the wooden panel and top of the template is aligned to the top face of the wooden panel. 4 Predrill custom panel holes * This dimension is for 4" (10.2 cm) toe kick. If the installation needs a higher toe kick, adjust the height of the wood panel accordingly. Not recommended for toe kicks greater than 6" (15.2 cm). NOTE: Do not drill deeper then ⁵⁄₈" to keep from drilling through panel. Pilot hole depths given are for ³⁄₄" thick panel. Mark 4 pilot holes on the wooden panel using the template provided. Predrill 4 pilot holes using a drill bit. Use tape to mark the drill bit to gauge hole depth. Drill pilot holes approximately ⁵⁄₈" into the custom panel. 15
-
 1
1 -
2
-
3
-
4
-
5
-
6
-
7
-
8
-
9
-
 10
10 -
 11
11 -
 12
12 -
 13
13 -
 14
14 -
 15
15 -
 16
16 -
 17
17 -
 18
18 -
 19
19 -
 20
20 -
21
-
22
-
23
-
24
-
25
-
26
-
27
-
28
-
29
-
30
-
31
-
32
-
33
-
34
-
35
-
36
-
37
-
38
-
39
-
40
-
41
-
42
-
43
-
44
-
45
-
46
-
47
-
48
-
49
-
50
-
51
-
52
 |
 |