KitchenAid KUDF204KPA Owners Manual - Page 8
Move the Refrigerator Drawers, to Final Location, Level the Refrigerator Drawers
 |
View all KitchenAid KUDF204KPA manuals
Add to My Manuals
Save this manual to your list of manuals |
Page 8 highlights
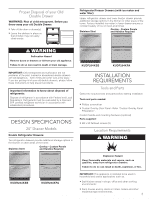
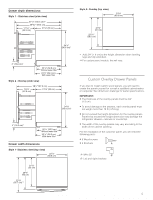
2. Turn ON shutoff valve. 3. Check for leaks. Tighten any connections (including connections at the valve) or A nuts that leak. C A- Plug with compression nut C- Pex tubing 4. The ice maker is equipped with a built-in water strainer. If your water conditions require a second water strainer, install it in the 1/4" (0.63 cm) water line at either tube connection. Obtain a water strainer from your nearest appliance dealer. 5. Plug in refrigerator or reconnect power. Level the Refrigerator Drawers IMPORTANT: Overlay Model-Be sure to install the custom overlay drawer panels before leveling the refrigerator drawers. See "Install Custom Overlay Drawer Panels." Before installing the refrigerator drawers, be sure that the countertop is level. If the countertop is not level, adjust the refrigerator drawers' leveling legs until the appliance is square with the countertop. Be sure to maintain 3/8" (0.95 cm) minimum gap between the top of the drawer and the countertop. 1. Open the top drawer and place the level across the top drawer, as shown. Check the level from left to right. A Move the Refrigerator Drawers to Final Location 1. Place top of cardboard carton or plywood under the appliance. Remove dolly. 2. Do not remove film or cover. Electrical Shock Hazard Plug into a grounded 3 prong outlet. Do not remove ground prong. Do not use an adapter. Do not use an extension cord. Failure to follow these instructions can result in death, fire, or electrical shock. 3. Plug into a grounded 3 prong outlet. Excessive Weight Hazard Use two or more people to move and install or uninstall appliance. Failure to do so can result in back or other injury. 4. Move the refrigerator drawers straight back and evenly in front of the opening. A- Check the level from left to right. 2. Turn the leveling legs (front and back) until the top drawer measures level from left to right. 3. Remove the level and close the top drawer. Check the gap between the top of the drawer and the countertop. If the gap measures less than 3/8" (0.95 cm) minimum, turn all four leveling bolts equally to the left to raise the leveling legs (this will lower the appliance). Recheck the level. 4. Open both drawers less than midway. Place the level on the side flange beside the drawers as shown. Turn the front leveling bolts together in order to either raise or lower the appliance until the sides of the refrigerator drawers are plumb. A- Check the level from front to back. A 5. Remove the level and close the drawers. Recheck the gap between the top of the drawer and the countertop. If the gap measures less than 3/8" (0.95 cm), turn all four leveling bolts equally to raise the leveling legs (this will lower the appliance). Recheck the level. NOTE: Be sure to recheck the horizontal level of the top drawer. 6. Be sure all four levelers are on the floor and supporting the full weight of the refrigerator drawers. 8 05-May-2021 10:43:59 EDT | RELEASED In some European factories the letter "W" of the part code mentioned herein will be automatically replaced by the number "4000" (e.g. "W12345678" becomes "400012345678")
-
 1
1 -
2
-
 3
3 -
 4
4 -
 5
5 -
 6
6 -
 7
7 -
 8
8 -
 9
9 -
 10
10 -
 11
11 -
 12
12 -
 13
13 -
14
-
15
-
16
-
17
-
18
-
19
-
20
-
21
-
22
-
23
-
24
-
25
-
26
-
27
-
28
-
29
-
30
-
31
-
32
-
33
-
34
-
35
-
36
-
37
-
38
-
39
-
40
-
41
-
42
-
43
-
44
-
45
-
46
-
47
-
48
-
49
-
50
-
51
-
52
 |
 |
