KitchenAid kco1005 Instructions and Recipes - Page 11
Toasting with the Countertop Oven, Warming plus keeping warm and heating, with the Countertop Oven
 |
UPC - 050946986227
View all KitchenAid kco1005 manuals
Add to My Manuals
Save this manual to your list of manuals |
Page 11 highlights
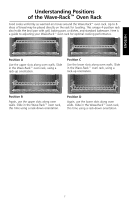
ENGLISH Toasting with the Countertop Oven Both the top and bottom elements will heat when this function is used. Recommended Positions: Use the lower slots along oven walls. Slide in the Wave-Rack™ oven rack, using a rack-up orientation (see Position C on page 7). 1. For best results, place the bread to be toasted directly on the rack and toward center of the oven. NOTE: For best results, do not use broil pan when toasting. 2. Toast up to six slices of bread. When toasting only one or two slices of bread, center the bread in the oven. 3. Close the door. 4. Turn the Function control knob to the Toast setting. 5. Turn the Temperature control knob clockwise to the Broil/Toast setting. 6. Turn the Time control knob clockwise to the desired toast color. For Dark toast, turn the control to the dark icon (between 5 and 10). For Light toast, first turn the control past the 10-minute indicator mark, and then turn control back to the light icon (between 0 and 5). TIP: For more consistent results, preheat oven for 5 minutes prior to first batch of toast. 7. The bell will ring and the oven will automatically shut off when the Countertop Oven has finished toasting. 8. Turn the Time control knob to 0 (off) if toast is removed before the bell rings. 9. Adjust Time control knob settings as needed to get desired results. NOTE: It is normal for condensation to form on the door when toasting moist or fresh breads. Warming (plus keeping warm and heating) with the Countertop Oven Select the rack-positioning slots, Wave-Rack™ oven rack, and broil pan with grill positions to match the size of food being heated. Only the lower heating element is on during warming. Suggested Positions: Use the broil pan with grill combination. When first using the oven, position the Wave-Rack™ oven rack as shown in Position C on page 7. Then, adjust as needed for your cooking situation. 1. Turn the Function control knob to the Warm setting. 2. Turn the Temperature control knob to a desired setting. 3. Turn the Time control knob to a desired setting. 9
-
 1
1 -
2
-
3
-
4
-
5
-
 6
6 -
 7
7 -
 8
8 -
 9
9 -
 10
10 -
 11
11 -
 12
12 -
 13
13 -
 14
14 -
 15
15 -
 16
16 -
17
-
18
-
19
-
20
-
21
-
22
-
23
-
24
-
25
-
26
-
27
-
28
-
29
-
30
-
31
-
32
-
33
-
34
-
35
-
36
-
37
-
38
-
39
-
40
-
41
-
42
-
43
-
44
-
45
-
46
-
47
-
48
-
49
-
50
-
51
-
52
-
53
-
54
-
55
-
56
-
57
-
58
-
59
-
60
-
61
-
62
-
63
-
64
-
65
-
66
-
67
-
68
-
69
-
70
-
71
-
72
 |
 |
