Konica Minolta Kodak ScanMate i1150 User Guide - Page 27
Cleaning the imaging area, Running a transport cleaning sheet
 |
View all Konica Minolta Kodak ScanMate i1150 manuals
Add to My Manuals
Save this manual to your list of manuals |
Page 27 highlights
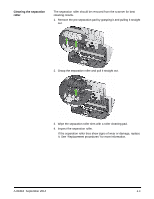
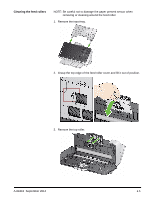
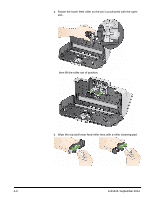
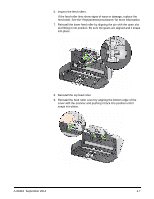
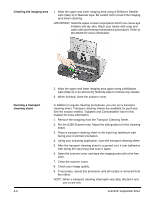
Cleaning the imaging area 1. Wipe the upper and lower imaging area using a Brillianze Detailer wipe (Step 1) or Staticide wipe. Be careful not to scratch the imaging area when cleaning. IMPORTANT: Staticide wipes contain isopropanol which can cause eye irritation and dry skin. Wash your hands with soap and water after performing maintenance procedures. Refer to the MSDS for more information. Running a transport cleaning sheet 4-8 2. Wipe the upper and lower imaging area again using a Brillianize wipe (Step 2) or an almost dry Staticide wipe to remove any streaks. 3. When finished, close the scanner cover. In addition to regular cleaning procedures, you can run a transport cleaning sheet. Transport cleaning sheets are available for purchase. See the section entitled, "Supplies and Consumables" later in this chapter for more information. 1. Remove the wrapping from the Transport Cleaning Sheet. 2. For the i1180 Scanner only. Adjust the side guides to fit the cleaning sheet. 3. Place a transport cleaning sheet in the input tray (adhesive side facing you) in portrait orientation. 4. Using your scanning application, scan the transport cleaning sheet. 5. After the transport cleaning sheet is scanned, turn it over (adhesive side facing the input tray) and scan it again. 6. Open the scanner cover and wipe the imaging area with a lint-free cloth. 7. Close the scanner cover. 8. Check your image quality. 9. If necessary, repeat this procedure until all residue is removed from the rollers. NOTE: When a transport cleaning sheet gets very dirty, discard it and use a new one. A-61816 September 2014
-
 1
1 -
2
-
3
-
4
-
5
-
6
-
7
-
8
-
9
-
10
-
11
-
12
-
13
-
14
-
15
-
16
-
17
-
18
-
19
-
20
-
21
-
 22
22 -
 23
23 -
 24
24 -
 25
25 -
 26
26 -
 27
27 -
 28
28 -
 29
29 -
 30
30 -
 31
31 -
 32
32 -
33
-
34
-
35
-
36
-
37
-
38
-
39
-
40
-
41
 |
 |
