Konica Minolta Kodak ScanMate i1150 User Guide - Page 8
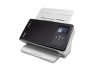
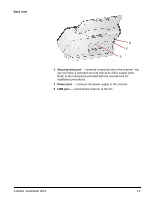
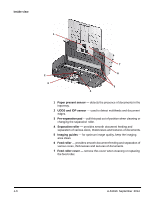
Scanner components, Front view, Input tray, Side guides, Gap release, Scanner cover, Ledge, End Stop
 |
View all Konica Minolta Kodak ScanMate i1150 manuals
Add to My Manuals
Save this manual to your list of manuals |
Page 8 highlights
Scanner components Front view 1 2 3 14 13 4 12 11 10 5 7 6 9 8 1 Input tray - the input tray holds up to the 50 documents (20 lb./ 80 g/m2) and can be extended to accommodate documents up to legal size (14 inches). 2 Side guides - the side guides on the Kodak ScanMate i1180 Scanner can be moved in and out to accommodate the size of the documents you are scanning. The side guides on the Kodak ScanMate i1150 Scanner are not adjustable. 3 Gap release - allows you to manually adjust the space between the feed roller and separation roller for documents that require special handling (e.g., documents that are badly torn). When using the gap release, pull the gap release out to feed special documents. When finished, push the gap release back in place. 4 Scanner cover - provides access to internal components such as, the imaging area and the feed and separation rollers. 5 Ledge - for holding a small reference document. 6 End Stop - can be lifted up when scanning documents for better document stacking. 7 Output tray - collects the scanned documents. The output tray can be pulled out and extended to accommodate documents up to 35.56 cm (14 inches) in length. 8 Power button - touch this location to turn on the scanner. A-61816 September 2014 1-3
-
 1
1 -
2
-
 3
3 -
 4
4 -
 5
5 -
 6
6 -
 7
7 -
 8
8 -
 9
9 -
 10
10 -
 11
11 -
 12
12 -
 13
13 -
14
-
15
-
16
-
17
-
18
-
19
-
20
-
21
-
22
-
23
-
24
-
25
-
26
-
27
-
28
-
29
-
30
-
31
-
32
-
33
-
34
-
35
-
36
-
37
-
38
-
39
-
40
-
41
 |
 |
