Konica Minolta Kodak i1320 Plus User Guide - Page 14
Attaching the optional output tray kit
 |
View all Konica Minolta Kodak i1320 Plus manuals
Add to My Manuals
Save this manual to your list of manuals |
Page 14 highlights
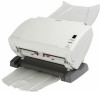
Attaching the optional output tray kit The Kodak i1200/i1300 Plus Series Scanners are shipped with an output tray kit, which includes: an output tray extension, dangler and clip. This output tray is optional but is recommended when scanning large stacks of documents. clip dangler output tray extension To install the output tray kit: 1. Remove the standard output tray from underneath the scanner by pressing down on the two tabs and pulling the output tray out of position. 2. Press and hold the tilt button and rotate the scanner body to the downward position. NOTE: The scanner must be in the downward position when using this output tray. 2-4 A-61560 January 2010
-
 1
1 -
2
-
3
-
4
-
5
-
6
-
7
-
8
-
 9
9 -
 10
10 -
 11
11 -
 12
12 -
 13
13 -
 14
14 -
 15
15 -
 16
16 -
 17
17 -
 18
18 -
 19
19 -
20
-
21
-
22
-
23
-
24
-
25
-
26
-
27
-
28
-
29
-
30
-
31
-
32
-
33
-
34
-
35
-
36
-
37
-
38
-
39
-
40
-
41
-
42
-
43
-
44
-
45
-
46
-
47
 |
 |

2-4
A-61560
January 2010
Attaching the
optional
output tray kit
The
Kodak
i1200/i1300 Plus Series Scanners are shipped with an
output tray kit, which includes: an output tray extension, dangler and
clip. This output tray is optional but is recommended when scanning
large stacks of documents.
To install the output tray kit:
1.
Remove the standard output tray from underneath the scanner by
pressing down on the two tabs and pulling the output tray out of
position.
2.
Press and hold the tilt button and rotate the scanner body to the
downward position.
NOTE:
The scanner must be in the downward position when using
this output tray.
clip
dangler
output tray extension