Konica Minolta Kodak i1440 User Guide - Page 24
Document printer, Open a new ink cartridge, slide it into the printer carrier and lower
 |
View all Konica Minolta Kodak i1440 manuals
Add to My Manuals
Save this manual to your list of manuals |
Page 24 highlights
Document printer 1. If you are installing the ink cartridge for the first time, push the connector on the printer cable firmly into the printer carrier. NOTE: If you are replacing an ink cartridge, the printer cable will already be installed and you just need to remove the printer carrier from it's position and remove the empty ink cartridge. 2. Open a new ink cartridge, slide it into the printer carrier and lower the locking bar around the ink cartridge. NOTE: If the ribbon cable should become disconnected, snap it back into position. 4-6 A-61550 February 2010
-
 1
1 -
2
-
3
-
4
-
5
-
6
-
7
-
8
-
9
-
10
-
11
-
12
-
13
-
14
-
15
-
16
-
17
-
18
-
 19
19 -
 20
20 -
 21
21 -
 22
22 -
 23
23 -
 24
24 -
 25
25 -
 26
26 -
 27
27 -
 28
28 -
 29
29 -
30
-
31
-
32
-
33
-
34
-
35
-
36
-
37
-
38
-
39
-
40
-
41
-
42
-
43
-
44
-
45
-
46
-
47
-
48
-
49
-
50
-
51
-
52
-
53
-
54
-
55
-
56
-
57
-
58
-
59
 |
 |

4-6
A-61550
February 2010
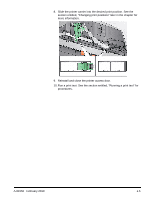
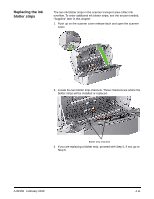
Document printer
1.
If you are installing the ink cartridge for the first time, push the
connector on the printer cable firmly into the printer carrier.
NOTE:
If you are replacing an ink cartridge, the printer cable will
already be installed and you just need to remove the printer
carrier from it’s position and remove the empty ink
cartridge.
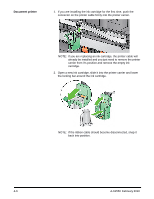
2.
Open a new ink cartridge, slide it into the printer carrier and lower
the locking bar around the ink cartridge.
NOTE:
If the ribbon cable should become disconnected, snap it
back into position.