Konica Minolta ProJet 3510 HD Cube3 User Guide - Page 89
Manual Gap Adjustment
 |
View all Konica Minolta ProJet 3510 HD manuals
Add to My Manuals
Save this manual to your list of manuals |
Page 89 highlights
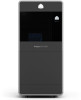
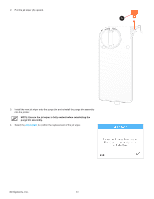
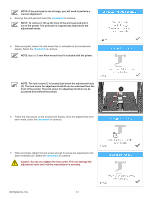
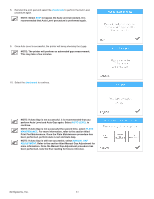
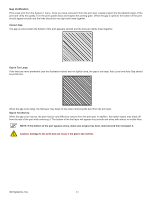
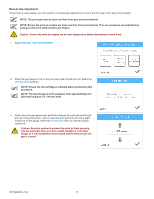
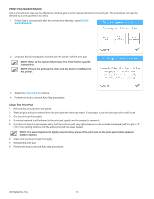
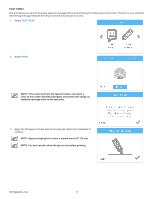
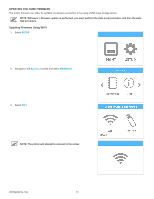
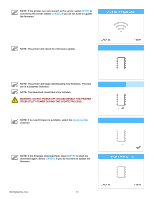
Manual Gap Adjustment If Auto Gap is unsuccessful, you may perform a manual gap adjustment to ensure the first layer of the part prints properly. NOTE: The print pad must be clean and free from glue and print material. NOTE: Ensure the print jet nozzles are clean and free from print material. This can usually be accomplished by pulling out the print material with your fingers. Caution: Ensure the print jet nozzles are at room temperature before attempting to clean them. 1. Select MANUAL GAP ADJUSTMENT. 2. Place the gap gauge on top of the print pad under the left print jet. Select the checkmark to continue. NOTE: Ensure the left cartridge is installed before performing this procedure. NOTE: The Gap Gauge is a thin polyester strip approximately 8.5" (216 mm) long and 1.5" (38 mm) wide. 3. Gently slide the gap gauge back and forth between the print pad and the left print jet. Using the arrows, raise or lower the print pad until you feel a slight resistance on the gauge. Select the checkmark when you feel the proper resistance. Caution: Exercise caution to prevent the print jet from pressing into the print pad. Once you feel a slight resistance in the Gap Gauge as it moves between the print pad and the left print jet, the gap is correct. 3D Systems, Inc. 85
-
 1
1 -
2
-
3
-
4
-
5
-
6
-
7
-
8
-
9
-
10
-
11
-
12
-
13
-
14
-
15
-
16
-
17
-
18
-
19
-
20
-
21
-
22
-
23
-
24
-
25
-
26
-
27
-
28
-
29
-
30
-
31
-
32
-
33
-
34
-
35
-
36
-
37
-
38
-
39
-
40
-
41
-
42
-
43
-
44
-
45
-
46
-
47
-
48
-
49
-
50
-
51
-
52
-
53
-
54
-
55
-
56
-
57
-
58
-
59
-
60
-
61
-
62
-
63
-
64
-
65
-
66
-
67
-
68
-
69
-
70
-
71
-
72
-
73
-
74
-
75
-
76
-
77
-
78
-
79
-
80
-
81
-
82
-
83
-
 84
84 -
 85
85 -
 86
86 -
 87
87 -
 88
88 -
 89
89 -
 90
90 -
 91
91 -
 92
92 -
 93
93 -
 94
94 -
95
-
96
-
97
-
98
-
99
-
100
-
101
-
102
 |
 |