Konica Minolta bizhub 363 bizhub 423/363/283/223 Fax Driver Operations User Gu - Page 26
Windows 2000 - driver windows 10
 |
View all Konica Minolta bizhub 363 manuals
Add to My Manuals
Save this manual to your list of manuals |
Page 26 highlights
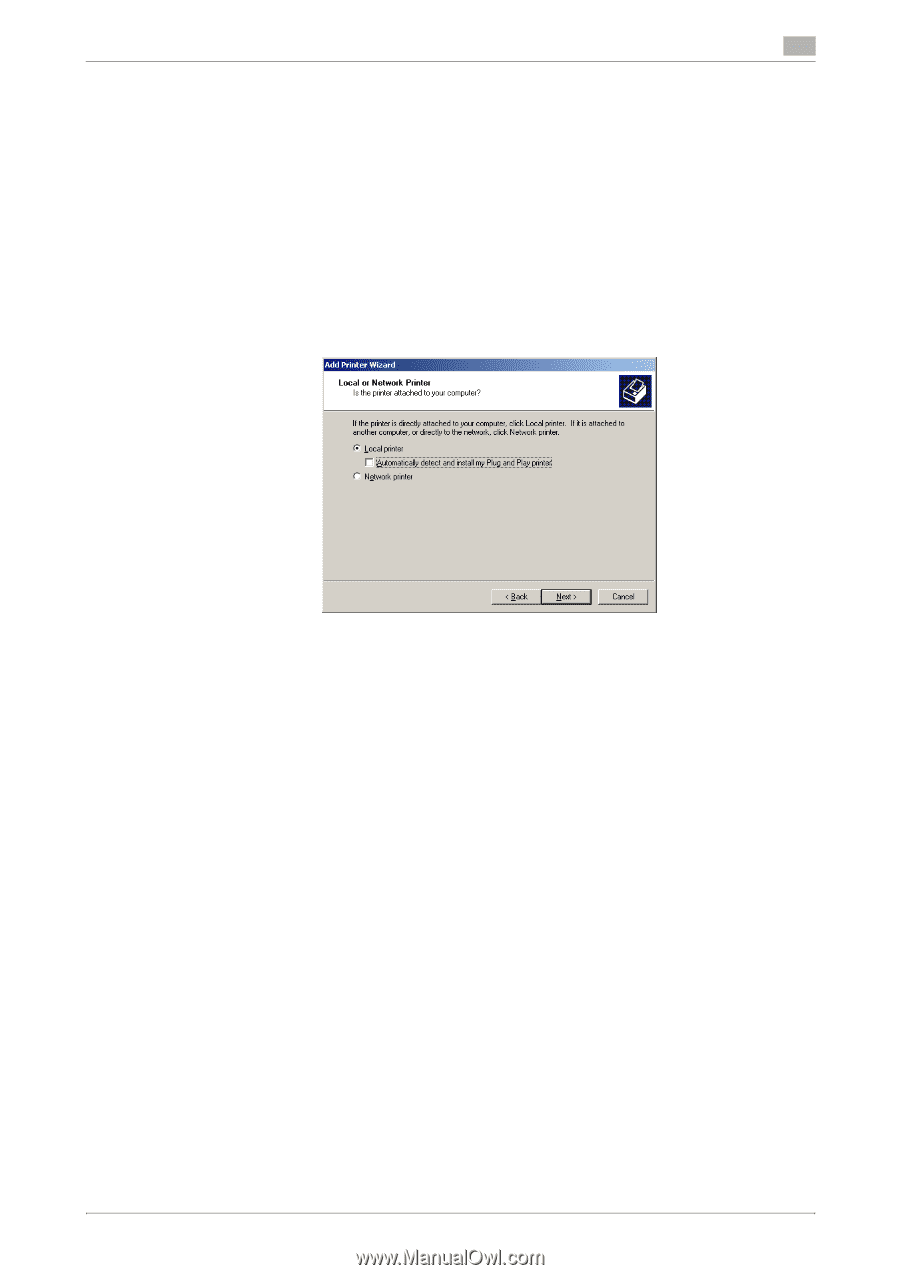
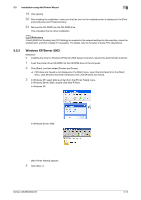
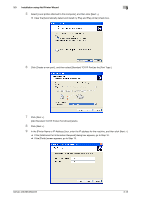
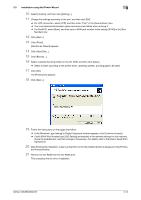
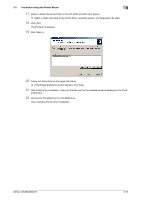
3.3 Installation using Add Printer Wizard 3 3.3.4 Windows 2000 Reference - Installing the driver to Windows 2000-based computers requires the administrator authority. 1 Insert the printer driver CD-ROM into the CD-ROM drive of the computer. 2 Click [Start], and then select [Settings] - [Printers]. 3 Double-click the [Add Printer] icon. [Add Printer Wizard] appears. 4 Follow the instructions on the pages that follow. 5 On the page for specifying how the printer is attached, select [Local printer]. 6 Click [Next >]. A page for selecting a port appears. 7 Click [Create a new port:], and then select [Standard TCP/IP Port] as the type of port. 8 Click [Next >]. [Add Standard TCP/IP Printer Port Wizard] starts. 9 Click [Next >]. 10 In the [Printer Name or IP Address:] box, enter the IP address for the machine, and then click [Next >]. % If the [Additional Port Information Required] dialog box appears, go to Step 11. % If the [Finish] screen appears, go to Step 14. 11 Select [Custom], and then click [Settings...]. 12 Change the settings according to the port, and then click [OK]. % For LPR connection, select [LPR], and then enter [Print] in the [Queue Name:] box. % You must discriminate between upper and lower case letters when entering it. % For Port9100, select [Raw], and then enter a RAW port number (initial setting: [9100]) in the [Port Number:] box. 13 Click [Next >]. 14 Click [Finish]. [Add Printer Wizard] appears. 15 Click [Have Disk...]. 16 Click [Browse...]. bizhub 423/363/283/223 3-15
-
 1
1 -
2
-
3
-
4
-
5
-
6
-
7
-
8
-
9
-
10
-
11
-
12
-
13
-
14
-
15
-
16
-
17
-
18
-
19
-
20
-
 21
21 -
 22
22 -
 23
23 -
 24
24 -
 25
25 -
 26
26 -
 27
27 -
 28
28 -
 29
29 -
 30
30 -
 31
31 -
32
-
33
-
34
-
35
-
36
-
37
-
38
-
39
-
40
-
41
-
42
-
43
-
44
-
45
-
46
-
47
-
48
-
49
-
50
-
51
-
52
-
53
-
54
-
55
-
56
-
57
-
58
-
59
-
60
-
61
-
62
-
63
-
64
-
65
-
66
-
67
-
68
-
69
-
70
-
71
-
72
-
73
-
74
-
75
-
76
 |
 |