Konica Minolta bizhub 421 bizhub 361/421/501 Fax Driver Operations User Manual - Page 33
Setting up the fax driver Windows
 |
View all Konica Minolta bizhub 421 manuals
Add to My Manuals
Save this manual to your list of manuals |
Page 33 highlights
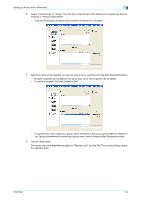
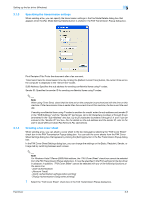
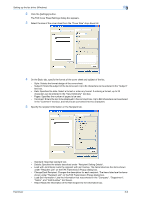
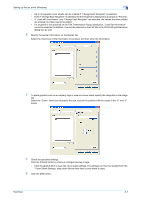
Setting up the fax driver (Windows) 3 3 3.1 3.1.1 Setting up the fax driver (Windows) Sending a fax Fax operations 2 Reminder To use the fax function, you must install the optional fax kit onto this machine. In addition, you must enable the fax kit on the Configure tab after installation. For details, refer to "Specifying the Configure tab settings" on page 3-18. ! Detail For details on the fax function of this machine, refer to the User's Guide [Network Scan/Fax/Network Fax Operations]. 1 Create the data you want to send using any application. 2 From the [File] menu, select "Print". 3 From "Printer Name", select "FAX Driver". 4 Click the [Preferences] button or the [Properties] button to change the fax driver settings as necessary. - By clicking the [Preferences] button or the [Properties] button in the Print dialog box, you can specify the settings of each model in the FAX Printing Preferences dialog box that appears. For details, refer to "Settings" on page 3-8. 5 Click the [Print] button. The FAX Transmission Popup dialog box appears. 6 Enter the recipient's name and fax number in the "Name" and "FAX Number" text boxes. - Up to 80 characters can be entered in the "Name" text box. - Up to 38 characters (numbers 0 through 9, hyphens (-), #, *, P, and T) can be entered in the "FAX Number" text box. To send a fax overseas, be sure to enter the country code first. Fax Driver 3-2
-
 1
1 -
2
-
3
-
4
-
5
-
6
-
7
-
8
-
9
-
10
-
11
-
12
-
13
-
14
-
15
-
16
-
17
-
18
-
19
-
20
-
21
-
22
-
23
-
24
-
25
-
26
-
27
-
 28
28 -
 29
29 -
 30
30 -
 31
31 -
 32
32 -
 33
33 -
 34
34 -
 35
35 -
 36
36 -
 37
37 -
 38
38 -
39
-
40
-
41
-
42
-
43
-
44
-
45
-
46
-
47
-
48
-
49
-
50
-
51
-
52
-
53
-
54
-
55
-
56
-
57
-
58
-
59
-
60
-
61
-
62
-
63
-
64
-
65
-
66
-
67
 |
 |
