Konica Minolta bizhub 4750 bizhub 4750/4050 Maintenance/Troubleshooting User G - Page 40
Problems on print quality, Cannot print, Description of problem, Cause, Remedy, Toner Cartridge
 |
View all Konica Minolta bizhub 4750 manuals
Add to My Manuals
Save this manual to your list of manuals |
Page 40 highlights
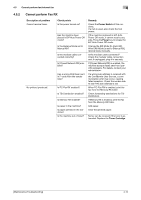
4.3 Cannot print 4 4.3.2 Problems on print quality Description of problem No data is printed. Printed in jet black. A print is faint. A print is dark. Cause A Toner Cartridge is damaged. The Imaging Unit is damaged. Paper is damp. The paper setting of the printer driver does not match the paper that is actually loaded on this machine. The power supply does not match the specification of this machine. Multiple sheets are fed out simultaneously. Paper is not correctly loaded into the paper tray. A Toner Cartridge is damaged. The Imaging Unit is damaged. The laser lens is dirty. Paper is damp. Toner is running out in the Toner Cartridge. A Toner Cartridge is damaged. The Imaging Unit is damaged. The correct paper type is not specified. A Toner Cartridge is damaged. The Imaging Unit is damaged. The original does not stick fast to the Original Glass. The specified copy density is too high. Remedy Remove the Toner Cartridge, then check it for damage. If the Toner Cartridge is damaged, replace it. Remove Imaging Unit, then check them for damage. If necessary, replace Imaging Unit. Adjust the humidity of the paper storage place. Remove the damp paper, then replace it with new dry paper. Load the correct paper in this machine. Use the power supply that matches the specification. Remove paper from the paper tray, then check it for static electricity. Flip through the paper, then return it into the paper tray. Remove paper, align its edges, return it into the paper tray, then adjust the paper guide. Remove the Toner Cartridge, then check it for damage. If the Toner Cartridge is damaged, replace it. Remove Imaging Unit, then check them for damage. If necessary, replace Imaging Unit. Clean the laser lens. Remove the damp paper, then replace it with new dry paper. Replace the Toner Cartridge. Remove the Toner Cartridge, then check it for damage. If the Toner Cartridge is damaged, replace it. Remove Imaging Unit, then check them for damage. If necessary, replace Imaging Unit. When printing on thick paper, envelope, label sheet, postcard, glossy paper, single side only paper, special paper, or letterhead, specify the paper type using the printer driver. Remove the Toner Cartridge, then check it for damage. If the Toner Cartridge is damaged, replace it. Remove Imaging Unit, then check them for damage. If necessary, replace Imaging Unit. Position the original so that it is pressed closely against the Original Glass. Set the copy density to a lower level. [Maintenance/Troubleshooting] 4-7
-
 1
1 -
2
-
3
-
4
-
5
-
6
-
7
-
8
-
9
-
10
-
11
-
12
-
13
-
14
-
15
-
16
-
17
-
18
-
19
-
20
-
21
-
22
-
23
-
24
-
25
-
26
-
27
-
28
-
29
-
30
-
31
-
32
-
33
-
34
-
 35
35 -
 36
36 -
 37
37 -
 38
38 -
 39
39 -
 40
40 -
 41
41 -
 42
42 -
 43
43 -
 44
44 -
 45
45 -
46
-
47
-
48
-
49
-
50
-
51
-
52
-
53
-
54
-
55
-
56
 |
 |
