Konica Minolta bizhub 501 bizhub 361/421/501 Network Administrator User Manual - Page 196
Registering or editing destinations to be temporarily used
 |
View all Konica Minolta bizhub 501 manuals
Add to My Manuals
Save this manual to your list of manuals |
Page 196 highlights
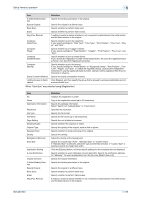
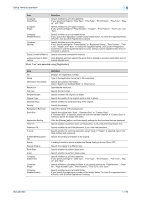
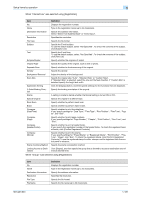
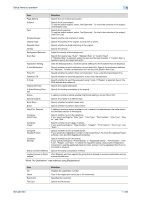
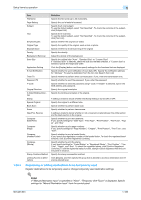
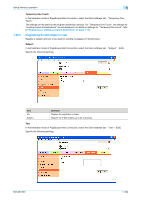
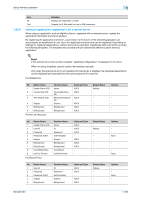
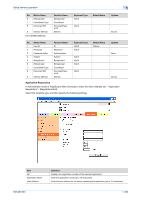
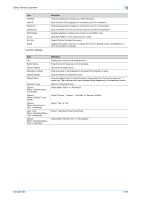
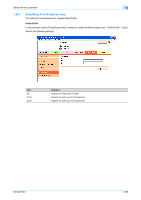
Setup items by operation 1 1.50.4 Item File Name Page Setting Subject Text Simplex/Duplex Original Type Separate Scan Density Background Removal Scan Size Application Setting E-mail Notification Timer TX Password TX F-Code Original Direction 2-Sided Binding Direction Stamp Special Original Book Scan Erase Neg./Pos. Reverse Compose (Date/Time) Compose (Page) Compose (Header/Footer) Compose (Stamp) Stamp Combine Method Limiting Access to Destinations Definition Specify the file name (up to 30 characters). Specify the unit of data to be saved. Specify the E-mail subject. To use the default subject, select "Not Specified". To check the contents of the subject, click [Subject List]. Specify the E-mail text. To use the default subject, select "Not Specified". To check the contents of the subject, click [Text List]. Specify whether the original is 2-sided. Specify the quality of the original, such as text or photo. Specify whether to divide scanning of the original. Specify the density. Adjust the density of the background. Specify the original size ("Auto", "Standard Size" or "Custom Size"). If "Standard Size" is selected, select the size and the feed direction. If "Custom Size" is selected, specify the height and width. Click the [Display] button, and then specify settings for the functions that are displayed. Specify whether to send notification of scan data URL. Specify the notification address for "Address". To select a destination from the list, click [Search from List]. Specify whether to perform timer communication. If yes, enter the transmission time. Specify whether to send the password. If yes, enter the password. Specify whether to send the password using F code. If "Enable" is selected, type in the SUB address and password. Specify the original orientation. Specify the binding orientation of the original. A setting is made to decide whether the Stamp Setting is turned ON or OFF. Specify the original in a different size. Specify whether to perform book scan. Specify whether to perform frame erase. A setting is made to decide whether or not a reversal is made between the white section and the black section in the original. Specify whether to print the date/time. If yes, specify settings for "Date Type", "Time Type", "Print Position", "Fine-Tune", "Pages", and "Size". Specify whether to print page numbers. If yes, specify settings for "Page Number", "Chapter", "Print Position", "Fine-Tune", and "Size". Specify whether to print a header/footer. If yes, specify the registration number of the header/footer. To check the registered header/footer, click [Confirm Registered Contents]. Specify whether to print the stamp. If yes, specify settings for "Preset Stamp" or "Registered Stamp", "Print Position", "FineTune", "Pages", and "Size". To check the registered stamp, click [Confirm Registered Contents]. To use the registered stamp function, stamps must be registered from the control panel in advance. Specify the stamp composition method. Click [Display], and then specify the group that is allowed to access a destination and reference allowed level. Registering or editing destinations to be temporarily used Register destinations to be temporarily used or change temporarily used destination settings. ! Detail If "Manual Destination Input" is specified to "Allow", "Temporary One-Touch" is displayed. Specify settings for "Manual Destination Input" from the control panel. 501/421/361 1-183
-
 1
1 -
2
-
3
-
4
-
5
-
6
-
7
-
8
-
9
-
10
-
11
-
12
-
13
-
14
-
15
-
16
-
17
-
18
-
19
-
20
-
21
-
22
-
23
-
24
-
25
-
26
-
27
-
28
-
29
-
30
-
31
-
32
-
33
-
34
-
35
-
36
-
37
-
38
-
39
-
40
-
41
-
42
-
43
-
44
-
45
-
46
-
47
-
48
-
49
-
50
-
51
-
52
-
53
-
54
-
55
-
56
-
57
-
58
-
59
-
60
-
61
-
62
-
63
-
64
-
65
-
66
-
67
-
68
-
69
-
70
-
71
-
72
-
73
-
74
-
75
-
76
-
77
-
78
-
79
-
80
-
81
-
82
-
83
-
84
-
85
-
86
-
87
-
88
-
89
-
90
-
91
-
92
-
93
-
94
-
95
-
96
-
97
-
98
-
99
-
100
-
101
-
102
-
103
-
104
-
105
-
106
-
107
-
108
-
109
-
110
-
111
-
112
-
113
-
114
-
115
-
116
-
117
-
118
-
119
-
120
-
121
-
122
-
123
-
124
-
125
-
126
-
127
-
128
-
129
-
130
-
131
-
132
-
133
-
134
-
135
-
136
-
137
-
138
-
139
-
140
-
141
-
142
-
143
-
144
-
145
-
146
-
147
-
148
-
149
-
150
-
151
-
152
-
153
-
154
-
155
-
156
-
157
-
158
-
159
-
160
-
161
-
162
-
163
-
164
-
165
-
166
-
167
-
168
-
169
-
170
-
171
-
172
-
173
-
174
-
175
-
176
-
177
-
178
-
179
-
180
-
181
-
182
-
183
-
184
-
185
-
186
-
187
-
188
-
189
-
190
-
 191
191 -
 192
192 -
 193
193 -
 194
194 -
 195
195 -
 196
196 -
 197
197 -
 198
198 -
 199
199 -
 200
200 -
 201
201 -
202
-
203
-
204
-
205
-
206
-
207
-
208
-
209
-
210
-
211
-
212
-
213
-
214
-
215
-
216
-
217
-
218
-
219
-
220
-
221
-
222
-
223
-
224
-
225
-
226
-
227
-
228
-
229
-
230
-
231
-
232
-
233
 |
 |