Konica Minolta bizhub C284 bizhub C554/C454/C364/C284/C224 Quick Assist Guide - Page 51
Control Panel, 2.4.1 Name of parts, Name of parts - password
 |
View all Konica Minolta bizhub C284 manuals
Add to My Manuals
Save this manual to your list of manuals |
Page 51 highlights
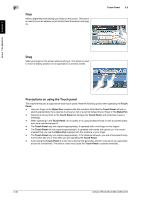
About This Machine Chapter 2 2 2.4 Control Panel 2.4 Control Panel This machine provides a sliding Control Panel. The hard keys required for basic operations are arranged on the front side, and the keys used for settings or registrations on the rear side. 2.4.1 Name of parts 1 12 2 3 4 5 6 11 No. Name 1 Touch Panel 2 Menu 3 Guidance 4 Access 5 Interrupt 6 Preview 7 Reset 8 Stop 9 Start 10 Register key 10 9 87 Description Various screens and messages are displayed. Directly touch the Touch panel to configure each setting. Press this key to display the main menu. Press this key to display the Help Menu. You can display descriptions of the functions and operating procedures on the screen. If user authentication or account track is enabled, enter the user name and password for user authentication or the account name and password for account track, then press this key to start the use of this machine. After a target operation is completed, press this key once again to end the use of this machine. Press this key to enter the Interrupt mode. The indicator lamp lights up blue in the Interrupt mode. To cancel the Interrupt mode, press the Interrupt key again. Press this key to print a single proof copy to be checked before printing a large number of copies. This function can also display a finishing image with the current settings on the Touch Panel. Press this key to reset all settings, excluding the registered ones, that you entered using the Control Panel. Press this key to temporarily stop an active copy, scan, or print job. Press to start the copy, scan or fax operation. Press each key to switch the display of the Touch Panel to a function assigned to a Register key. • 1 (Scan/Fax): Switches to the scan/fax function. • 2 (Copy): Switches to the copy function. • 10Keypad (10 Keypad): Displays the keypad on the Touch pan- el. The Register key can be assigned to any function in the Administrator Settings to be easy to use. 2-26 bizhub C554/C454/C364/C284/C224
-
 1
1 -
2
-
3
-
4
-
5
-
6
-
7
-
8
-
9
-
10
-
11
-
12
-
13
-
14
-
15
-
16
-
17
-
18
-
19
-
20
-
21
-
22
-
23
-
24
-
25
-
26
-
27
-
28
-
29
-
30
-
31
-
32
-
33
-
34
-
35
-
36
-
37
-
38
-
39
-
40
-
41
-
42
-
43
-
44
-
45
-
 46
46 -
 47
47 -
 48
48 -
 49
49 -
 50
50 -
 51
51 -
 52
52 -
 53
53 -
 54
54 -
 55
55 -
 56
56 -
57
-
58
-
59
-
60
-
61
-
62
-
63
-
64
-
65
-
66
-
67
-
68
-
69
-
70
-
71
-
72
-
73
-
74
-
75
-
76
-
77
-
78
-
79
-
80
-
81
-
82
-
83
-
84
-
85
-
86
-
87
-
88
-
89
-
90
-
91
-
92
-
93
-
94
-
95
-
96
-
97
-
98
-
99
-
100
-
101
-
102
-
103
-
104
-
105
-
106
-
107
-
108
-
109
-
110
-
111
-
112
-
113
-
114
-
115
-
116
-
117
-
118
-
119
-
120
-
121
-
122
-
123
-
124
-
125
-
126
-
127
-
128
-
129
-
130
-
131
-
132
-
133
-
134
-
135
-
136
-
137
-
138
-
139
-
140
-
141
-
142
-
143
-
144
-
145
-
146
-
147
-
148
-
149
-
150
-
151
-
152
-
153
-
154
-
155
-
156
-
157
-
158
-
159
-
160
-
161
-
162
-
163
-
164
-
165
-
166
 |
 |
