Konica Minolta bizhub C451 bizhub C451 PageScope Web Connection Operations Use - Page 89
Select Normal, Mixed Original, Z-Folded Original or Long, Preset Stamp or Registered Stamp
 |
View all Konica Minolta bizhub C451 manuals
Add to My Manuals
Save this manual to your list of manuals |
Page 89 highlights
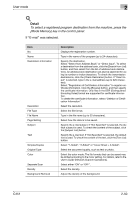
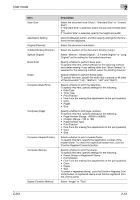
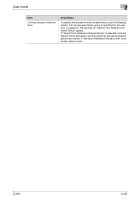
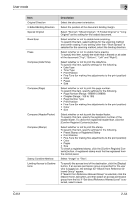
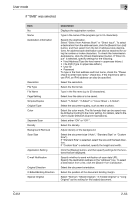
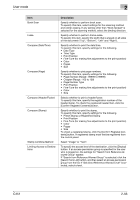
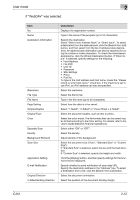
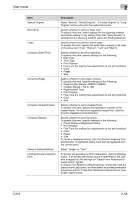
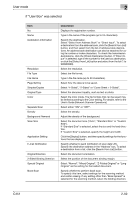
User mode 2 Item Original Direction 2-Sided Binding Direction Special Original Book Scan Erase Compose (Date/Time) Compose (Page) Compose (Header/Footer) Compose (Stamp) Stamp Combine Method Limiting Access to Destinations Description Select the document orientation. Select the position of the document binding margin. Select "Normal", "Mixed Original", "Z-Folded Original" or "Long Original" as the setting for the loaded document. Select whether or not to enable book scanning. To specify this item, select settings for the scanning method and center erasing. If any setting other than "Book Spread" is selected for the scanning method, select the binding direction. Select whether or not to enable frame erasing. To specify this item, specify the width that is erased on all sides of the document ("Top", "Bottom", "Left" and "Right"). Select whether or not to print the date/time. To specify this item, specify settings for the following. • Date Type • Time Type • Print Position • Fine-Tune (for making fine adjustments to the print position) • Color • Pages • Size Select whether or not to print the page number. To specify this item, specify settings for the following. • Page Number (Range: -99999 to 99999) • Chapter (Range: -100 to 100) • Page Number Type • Print Position • Fine-Tune (for making fine adjustments to the print position) • Color • Size Select whether or not to print the header/footer. To specify this item, specify the registration number of the header/footer. To check the registered header/foot, click the [Confirm Registed Contents] button. Select whether or not to print the stamp. To specify this item, specify settings for the following. • Preset Stamp or Registered Stamp • Print Position • Fine-Tune (for making fine adjustments to the print position) • Color • Pages • Size To check a registered stamp, click the [Confirm Registed Contents] button. A registered stamp must first be registered from the control panel. Select "Image" or "Text". To specify the access level of the destination, click the [Display] button. If an access permission group is specified for the user who is logged on, the settings for "Search from Reference Allowed Group" appear. If "Search from Reference Allowed Group" is selected, click the [Search from List] button, and then select an access permission group from the list. If "Set direct Reference Allowed Level" is selected, select a level. C451 2-54
-
 1
1 -
2
-
3
-
4
-
5
-
6
-
7
-
8
-
9
-
10
-
11
-
12
-
13
-
14
-
15
-
16
-
17
-
18
-
19
-
20
-
21
-
22
-
23
-
24
-
25
-
26
-
27
-
28
-
29
-
30
-
31
-
32
-
33
-
34
-
35
-
36
-
37
-
38
-
39
-
40
-
41
-
42
-
43
-
44
-
45
-
46
-
47
-
48
-
49
-
50
-
51
-
52
-
53
-
54
-
55
-
56
-
57
-
58
-
59
-
60
-
61
-
62
-
63
-
64
-
65
-
66
-
67
-
68
-
69
-
70
-
71
-
72
-
73
-
74
-
75
-
76
-
77
-
78
-
79
-
80
-
81
-
82
-
83
-
 84
84 -
 85
85 -
 86
86 -
 87
87 -
 88
88 -
 89
89 -
 90
90 -
 91
91 -
 92
92 -
 93
93 -
 94
94 -
95
-
96
-
97
-
98
-
99
-
100
-
101
-
102
-
103
-
104
-
105
-
106
-
107
-
108
-
109
-
110
-
111
-
112
-
113
-
114
-
115
-
116
-
117
-
118
-
119
-
120
-
121
-
122
-
123
-
124
-
125
-
126
-
127
-
128
-
129
-
130
-
131
-
132
-
133
-
134
-
135
-
136
-
137
-
138
-
139
-
140
-
141
-
142
-
143
-
144
-
145
-
146
-
147
-
148
-
149
-
150
-
151
-
152
-
153
-
154
-
155
-
156
-
157
-
158
-
159
-
160
-
161
-
162
-
163
-
164
-
165
-
166
-
167
-
168
-
169
-
170
-
171
-
172
-
173
-
174
-
175
-
176
-
177
-
178
-
179
-
180
-
181
-
182
-
183
-
184
-
185
-
186
-
187
-
188
-
189
-
190
-
191
-
192
-
193
-
194
-
195
-
196
-
197
-
198
-
199
-
200
-
201
-
202
-
203
-
204
-
205
-
206
-
207
-
208
-
209
-
210
-
211
-
212
-
213
-
214
-
215
-
216
-
217
-
218
-
219
-
220
-
221
-
222
-
223
-
224
-
225
-
226
-
227
-
228
-
229
-
230
-
231
-
232
-
233
-
234
-
235
-
236
-
237
-
238
-
239
-
240
-
241
-
242
-
243
-
244
-
245
-
246
 |
 |
