Kyocera ECOSYS M3540idn ECOSYS Model Printer Driver User Guide Rev 16.18.2013. - Page 29
Selecting SNMP Settings, Job E-mail Notification, Selecting E-mail Notification Options
 |
View all Kyocera ECOSYS M3540idn manuals
Add to My Manuals
Save this manual to your list of manuals |
Page 29 highlights
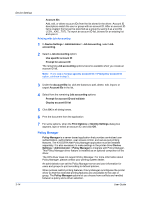
Device Settings This option uses the Advanced Encryption Standard for encryption. AES is a symmetric block cipher that can process data blocks of 128 bits, using cipher keys with lengths of 128, 192, and 256 bits. It is more secure than DES. Selecting SNMP Settings SNMP settings in the driver must be set to match the settings in the printing system's home page. 1 In Device Settings > Administrator > General, click SNMP Settings. 2 Select SNMPv1/v2c or SNMPv3. For SNMPv1/v2c, type the Read community name and Write community name, to a maximum of 32 characters. For SNMPv3, type a User name to a maximum of 32 characters, and a Password from 8 to 32 characters. 3 To set authentication and privacy options for SNMPv3, click Settings. 4 In the SNMPv3 Settings dialog box, select from the available options, and click OK. 5 Optional: Under Apply to other models, you can choose from available models. The SNMP settings are applied to all selected models. 6 Click OK in the SNMP Settings dialog box. Job E-mail Notification This option lets you send an e-mail address with a print job. When the job finishes printing, the device sends an e-mail notification to the e-mail address. This is useful when the device is printing many jobs and a user must wait for a job to print. For a restricted user in a client/server environment, the Administrator button in Device Settings becomes the Identity button. A user can enter e-mail notification data in the Identity Settings dialog box. Selecting E-mail Notification Options You can send an e-mail address with a print job, to notify you when the job finishes printing. 1 In Device Settings > Administrator > General, select Notify when printing is completed. 2 Choose an e-mail address option: Select Use specific e-mail address, and type a valid e-mail address. In a client/server environment, a client user can change this address. Select Prompt for e-mail address, and click OK. When you click OK in the Print dialog box, type a valid e-mail address in the Print Options or Identity Settings dialog box, and click OK. 3 Click OK in The Administrator Settings and Properties dialog boxes. Printer Driver 3-9
-
 1
1 -
2
-
3
-
4
-
5
-
6
-
7
-
8
-
9
-
10
-
11
-
12
-
13
-
14
-
15
-
16
-
17
-
18
-
19
-
20
-
21
-
22
-
23
-
 24
24 -
 25
25 -
 26
26 -
 27
27 -
 28
28 -
 29
29 -
 30
30 -
 31
31 -
 32
32 -
 33
33 -
 34
34 -
35
-
36
-
37
-
38
-
39
-
40
-
41
-
42
-
43
-
44
-
45
-
46
-
47
-
48
-
49
-
50
-
51
-
52
-
53
-
54
-
55
-
56
-
57
-
58
-
59
-
60
-
61
-
62
-
63
-
64
-
65
-
66
-
67
-
68
-
69
-
70
-
71
-
72
-
73
-
74
-
75
-
76
-
77
-
78
-
79
-
80
-
81
-
82
-
83
-
84
-
85
-
86
-
87
-
88
-
89
-
90
-
91
-
92
-
93
-
94
-
95
-
96
-
97
-
98
-
99
-
100
-
101
-
102
-
103
-
104
-
105
-
106
-
107
-
108
-
109
-
110
-
111
-
112
-
113
-
114
-
115
-
116
-
117
-
118
-
119
-
120
-
121
 |
 |
