Kyocera FS-1128MFP FS-1128MFP Fax Operation Guide Rev-3 - Page 96
YNOTE: ZNOTE, Right, Select, Right Select, Function, Description
 |
View all Kyocera FS-1128MFP manuals
Add to My Manuals
Save this manual to your list of manuals |
Page 96 highlights
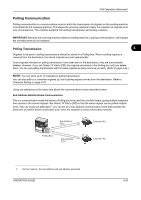
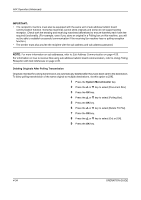
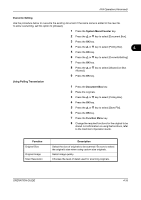
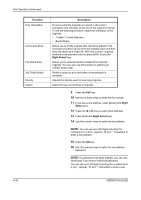
FAX Operation (Advanced) Function Orig. Orientation Continuous Scan File Name Entry Job Finish Notice Density Duplex Description To ensure that the originals are stored in the correct orientation, this indicates which end of the original is the top. To use the following functions, select the orientation of the originals. • 1-sided / 2-sided Selection • Border Erase Allows you to divide originals that cannot be placed in the document processor at one time into multiple scans and then store the result as a single file. With this function, originals continue to be scanned until you press [END Scan] (the Right Select key). Allows you to rename the files created from scanned originals. You can also use this function to add the job number and/or date. Sends a notice by an e-mail when a transmission is complete. Adjusts the density used for scanning originals. Select the type and binding of originals. 9 Press the FAX key. 10 Use the numeric keys to enter the fax number. 11 If you use a sub address, press [Detail] (the Right Select key). 12 Press the Y or Z key to select [Sub Address]. 13 Press [Edit] (the Right Select key). 14 Use the numeric keys to enter the sub address. NOTE: You can use up to 20 digits including the numbers from 0 to 9, ' (space)', '#' and '*' characters to enter a sub address. 15 Press the OK key. 16 Use the numeric keys to enter the sub address password. NOTE: If a password has been entered, you can only send faxes if you enter a matching password. You can use up to 20 digits including the numbers from 0 to 9, ' (space)', '#' and '*' characters to enter a sub 4-36 OPERATION GUIDE
-
 1
1 -
2
-
3
-
4
-
5
-
6
-
7
-
8
-
9
-
10
-
11
-
12
-
13
-
14
-
15
-
16
-
17
-
18
-
19
-
20
-
21
-
22
-
23
-
24
-
25
-
26
-
27
-
28
-
29
-
30
-
31
-
32
-
33
-
34
-
35
-
36
-
37
-
38
-
39
-
40
-
41
-
42
-
43
-
44
-
45
-
46
-
47
-
48
-
49
-
50
-
51
-
52
-
53
-
54
-
55
-
56
-
57
-
58
-
59
-
60
-
61
-
62
-
63
-
64
-
65
-
66
-
67
-
68
-
69
-
70
-
71
-
72
-
73
-
74
-
75
-
76
-
77
-
78
-
79
-
80
-
81
-
82
-
83
-
84
-
85
-
86
-
87
-
88
-
89
-
90
-
 91
91 -
 92
92 -
 93
93 -
 94
94 -
 95
95 -
 96
96 -
 97
97 -
 98
98 -
 99
99 -
 100
100 -
 101
101 -
102
-
103
-
104
-
105
-
106
-
107
-
108
-
109
-
110
-
111
-
112
-
113
-
114
-
115
-
116
-
117
-
118
-
119
-
120
-
121
-
122
-
123
-
124
-
125
-
126
-
127
-
128
-
129
-
130
-
131
-
132
-
133
-
134
-
135
-
136
-
137
-
138
-
139
-
140
-
141
-
142
-
143
-
144
-
145
-
146
-
147
-
148
-
149
-
150
-
151
-
152
-
153
-
154
-
155
-
156
-
157
-
158
-
159
-
160
-
161
-
162
-
163
-
164
-
165
-
166
-
167
-
168
-
169
-
170
-
171
-
172
-
173
-
174
-
175
-
176
-
177
-
178
-
179
-
180
-
181
-
182
-
183
-
184
-
185
-
186
-
187
-
188
 |
 |
