Kyocera KM-1810 Print System M Installation Handbook (Setup) - Page 11
Network TCP/IP settings
 |
View all Kyocera KM-1810 manuals
Add to My Manuals
Save this manual to your list of manuals |
Page 11 highlights
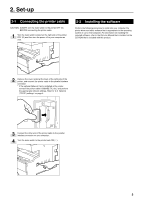
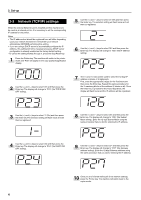
2. Set-up 2-3 Network (TCP/IP) settings When the optional Network Card is installed and this machine is to be used as a network printer, it is necessary to set the corresponding IP address for the printer. Notes • The IP address that should be registered here will differ depending upon your network environment. Check with your network administrator BEFORE performing this setting. • If you are using a DHCP server to automatically configure the IP address, this setting will not be necessary because DHCP server configuration is already enabled as the factory default setting. * To cancel the setting midway through it, press the Stop/Reset key. 1 Press the Printer key. The machine will switch to the printer mode and "P00" will appear in the copy quality/magnification display. 5 Use the (+) and (-) keys to select "2" (Off) and then press the Enter key. The selected setting will flash twice and will then be registered. 6 Use the (+) and (-) keys to select "25" and then press the Enter key. The display will change to "P25" (the IP address setting). 2 Use the (+) and (-) keys to select "23" and then press the Enter key. The display will change to "P23" (the TCP/IP ON/ OFF setting). 7 The (+) and (-) keys will be used to select the 12-digit IP address in blocks of 3 digits each: First, enter the appropriate 3 digits for the first block and then press the Enter key. Repeat this same procedure for the 3 remaining blocks of the address (4 blocks in all). Once the Enter key is pressed for the final 3-digit block, the display will flash twice and the IP address will be registered. 3 Use the (+) and (-) keys to select "1" (On) and then press the Enter key. The selected setting will flash twice and will then be registered. 8 Use the (+) and (-) keys to select "26" and then press the Enter key. The display will change to "P26" (the Subnet Mask setting). Enter the 12-digit Subnet Mask using the same procedure that you did for entering the IP address. 4 Use the (+) and (-) keys to select "24" and then press the Enter key. The display will change to "P24" (the DHCP ON/ OFF setting). 9 Use the (+) and (-) keys to select "27" and then press the Enter key. The display will change to "P27" (the Gateway address setting). Enter the 12-digit Gateway address using the same procedure that you did for entering the IP address. 10 Once you are finished making all of the network settings, press the Printer key. The machine will switch back to the copier mode. 4
-
 1
1 -
2
-
3
-
4
-
5
-
 6
6 -
 7
7 -
 8
8 -
 9
9 -
 10
10 -
 11
11 -
 12
12 -
 13
13 -
 14
14 -
 15
15 -
 16
16 -
17
-
18
-
19
-
20
-
21
-
22
-
23
-
24
-
25
-
26
-
27
-
28
-
29
-
30
-
31
-
32
-
33
-
34
-
35
-
36
-
37
-
38
-
39
-
40
-
41
-
42
-
43
-
44
-
45
-
46
-
47
-
48
 |
 |
