Kyocera TASKalfa 2420w TASKalfa 2420w PrintNet Client Operation Guide - Page 49
Cloud Scanning, Steps for Cloud Scanning, Scan to Print
 |
View all Kyocera TASKalfa 2420w manuals
Add to My Manuals
Save this manual to your list of manuals |
Page 49 highlights
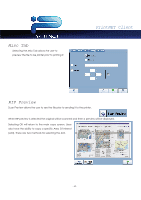
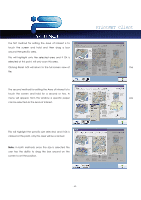
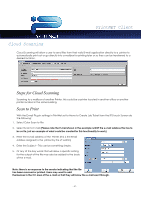
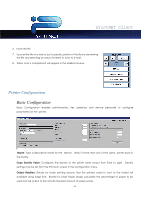
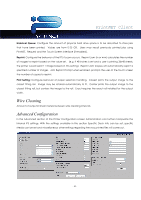
PrintNET Client Cloud Scanning Cloud Scanning will allow a user to send files from their valid E-mail application directly to a printer to automatically print out or go directly into a mailbox for printing later or so they can be transferred to a desired location. Steps for Cloud Scanning Scanning to a mailbox of another Printer, this could be a printer located in another office or another printer located in the same building. Scan to Print With the E-mail Plug in settings in PrintNet set to Move to Create Job Ticket from the IPS touch Screen do the following: 1. Select Color Scan to File 2. Select Scan to E-mail (Please note the E-mail shown in the example is NOT the e-mail address this has to be set to, just an example of what could be created for this functionality to work) 3. Enter the e-mail address of the Printer (This is the Email address assigned to the printer by the I/T Admin) 4. Enter the Subject - This can be something simple. 5. Or any of the Key words that will allow a specific setting for the output of the file may also be added to the body of the e-mail. Note: there is no response to the sender indicating that the file has been received or printed. Users may want to add themselves in the CC area of the e-mail so that they will know the e-mail went through. - 47 -
-
 1
1 -
2
-
3
-
4
-
5
-
6
-
7
-
8
-
9
-
10
-
11
-
12
-
13
-
14
-
15
-
16
-
17
-
18
-
19
-
20
-
21
-
22
-
23
-
24
-
25
-
26
-
27
-
28
-
29
-
30
-
31
-
32
-
33
-
34
-
35
-
36
-
37
-
38
-
39
-
40
-
41
-
42
-
43
-
 44
44 -
 45
45 -
 46
46 -
 47
47 -
 48
48 -
 49
49 -
 50
50 -
 51
51 -
 52
52 -
 53
53 -
 54
54 -
55
-
56
-
57
-
58
-
59
-
60
-
61
-
62
 |
 |