Kyocera TASKalfa 3212i 3212i/4012i KX Driver Operation Guide - Page 12
Installing with Custom Install, Products to Install
 |
View all Kyocera TASKalfa 3212i manuals
Add to My Manuals
Save this manual to your list of manuals |
Page 12 highlights
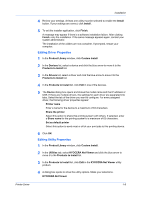
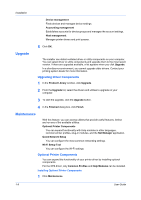
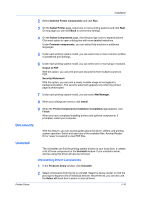
Installation You can also install utilities without printing systems or drivers by selecting the Utilities tab on the Custom Install dialog box. You can select the utilities you want from the Name list and move it to the Products to Install list. You can create a Package file (.EXE) of all drivers and utilities in the Products to Install list by clicking the right arrow located next to the Install button. If you have many computers to update, you do not need to run the installer on each computer. The created package can be distributed via email or a shared drive. Each user can run the package on their computer that automatically installs the driver or utility in that package. If the installer cannot find your printing system, contact your system administrator. Note: You must install .NET Framework 4.0 or later to use Status Monitor. Installing with Custom Install 1 Ensure that your printing system and computer are turned on and connected by USB or network cable. 2 In the Product Library window, click Custom Install. To discover a printing system, proceed to step 3. To add a printing system model and port name, proceed to step 5. 3 In the Custom Install window, the installer searches for your printing device. You can also search the discovered devices by model name, IP address, host name, or USB port when you type a partial or full term in the search text box above the device list. Each discovered printing system is displayed in the Devices list as an icon with a model name and port name. If your printing device is not discovered, proceed to step 5. 4 Select a printing device from the Devices list, and click the blue arrow to move it to the Products to Install list. Proceed to step 6. 5 If discovery does not find your printing device, double-click Add custom device. In the Devices dialog box, select from the Model list of supported models, and the Port name list of all local and network ports. To add a port connected to your system, click Add Port. Click OK in the Devices dialog box. The printing device appears in the Products to Install list. 6 Select a driver from the Drivers tab, and click the blue arrow to move it to the Products to Install list. One or more drivers are required to enable the Install button. 7 Select a utility from the Utilities tab, and click the blue arrow to move it to the Products to Install list. If a more recent version of a utility is installed, the utility shows a message that a newer version is installed. 8 If you want to remove a product from the Products to Install list, select it and click Delete. To remove all products, click the Remove all icon at the bottom of the list box. 1-5 User Guide
-
 1
1 -
2
-
3
-
4
-
5
-
6
-
 7
7 -
 8
8 -
 9
9 -
 10
10 -
 11
11 -
 12
12 -
 13
13 -
 14
14 -
 15
15 -
 16
16 -
 17
17 -
18
-
19
-
20
-
21
-
22
-
23
-
24
-
25
-
26
-
27
-
28
-
29
-
30
-
31
-
32
-
33
-
34
-
35
-
36
-
37
-
38
-
39
-
40
-
41
-
42
-
43
-
44
-
45
-
46
-
47
-
48
-
49
-
50
-
51
-
52
-
53
-
54
-
55
-
56
-
57
-
58
-
59
-
60
-
61
-
62
-
63
-
64
-
65
-
66
-
67
-
68
-
69
-
70
-
71
-
72
-
73
-
74
-
75
-
76
-
77
-
78
-
79
-
80
-
81
-
82
-
83
-
84
-
85
-
86
-
87
-
88
-
89
-
90
-
91
-
92
-
93
-
94
-
95
-
96
-
97
-
98
-
99
-
100
 |
 |