LG 29UM50-P Owners Manual - Page 13
Installing to a wall
 |
View all LG 29UM50-P manuals
Add to My Manuals
Save this manual to your list of manuals |
Page 13 highlights
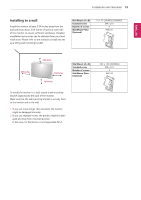
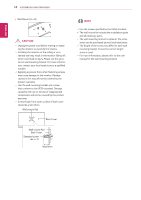
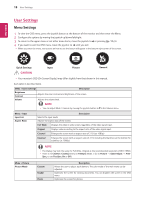
ENEGNLGISH ASSEMBLING AND PREPARING 13 Installing to a wall Install the monitor at least 3.94 inches away from the wall and leave about 3.94 inches of space at each side of the monitor to ensure sufficient ventilation. Detailed installation instructions can be obtained from your local retail store. Please refer to the manual to install and set up a tilting wall mounting bracket. Wall Mount (A x B) Standard screw Number of screws Wall Mount Plate (Optional) 75 x 75 (29UM50/29UM60) M4 x L10 4 RW120 3.94 inches 3.94 inches 3.94 inches 3.94 inches Wall Mount (A x B) Standard screw Number of screws Wall Mount Plate (Optional) 100 x 100 (34UM60) M4 x L10 4 RW120 To install the monitor to a wall, attach a wall mounting bracket (optional) to the back of the monitor. Make sure that the wall mounting bracket is securely fixed to the monitor and to the wall. 1 If you use screw longer than standard, the monitor might be damaged internally. 2 If you use improper screw, the product might be damaged and drop from mounted position. In this case, LG Electronics is not responsible for it.
-
 1
1 -
2
-
3
-
4
-
5
-
6
-
7
-
 8
8 -
 9
9 -
 10
10 -
 11
11 -
 12
12 -
 13
13 -
 14
14 -
 15
15 -
 16
16 -
 17
17 -
 18
18 -
19
-
20
-
21
-
22
-
23
-
24
-
25
-
26
-
27
 |
 |
