LG 49SL5B Owners Manual - Page 18
CAUTION, WARNING, Securing the monitor to a wall optional
 |
View all LG 49SL5B manuals
Add to My Manuals
Save this manual to your list of manuals |
Page 18 highlights
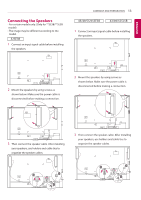
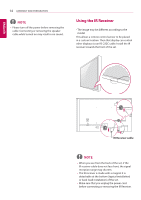
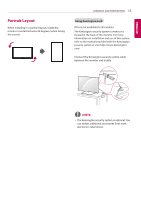
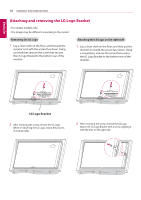
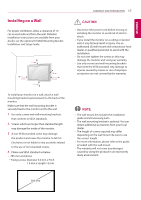
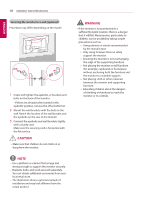
ENGLISH 18 ASSEMBLY AND PREPARATION Securing the monitor to a wall (optional) Procedure may differ depending on the model. 1 Insert and tighten the eyebolts, or brackets and bolts on the back of the monitor. - If there are already bolts inserted in the eyebolts' position, remove the other bolts first. 2 Mount the wall brackets with the bolts to the wall. Match the location of the wall bracket and the eyebolts on the rear of the monitor. 3 Connect the eyebolts and wall brackets tightly with a sturdy cord. Make sure the securing cord is horizontal with the flat surface. CAUTION •• Make sure that children do not climb on or hang from the monitor. NOTE •• Use a platform or cabinet that is large and strong enough to support the monitor securely. •• Brackets, bolts, and cords are sold separately. You can obtain additional accessories from your local retail store. •• The illustration shows a general example of installation and may look different from the actual product. WARNING •• If the monitor is not positioned in a sufficiently stable location, there is a danger that it will fall. Many injuries, particularly to children, can be avoided by taking simple precautions such as: »»Using cabinets or stands recommended by the manufacturer. »»Only using furniture that can safely support the monitor. »»Ensuring the monitor is not overhanging the edge of the supporting furniture. »»Not placing the monitor on tall furniture (for example, cupboards or bookcases) without anchoring both the furniture and the monitor to a suitable support. »»Not placing cloth or other materials between the monitor and supporting furniture. »»Educating children about the dangers of climbing on furniture to reach the monitor or its controls.
-
 1
1 -
2
-
3
-
4
-
5
-
6
-
7
-
8
-
9
-
10
-
11
-
12
-
 13
13 -
 14
14 -
 15
15 -
 16
16 -
 17
17 -
 18
18 -
 19
19 -
 20
20 -
 21
21 -
 22
22 -
 23
23 -
24
-
25
-
26
-
27
-
28
-
29
-
30
-
31
-
32
-
33
-
34
-
35
-
36
-
37
-
38
-
39
-
40
-
41
-
42
-
43
-
44
-
45
-
46
-
47
-
48
-
49
-
50
-
51
-
52
-
53
-
54
-
55
-
56
-
57
-
58
-
59
-
60
-
61
-
62
-
63
-
64
-
65
-
66
-
67
-
68
-
69
-
70
-
71
-
72
-
73
-
74
-
75
-
76
-
77
-
78
-
79
-
80
-
81
-
82
-
83
-
84
-
85
 |
 |
