LG DH65EL Service Manual - Page 21
capacitor.
 |
View all LG DH65EL manuals
Add to My Manuals
Save this manual to your list of manuals |
Page 21 highlights
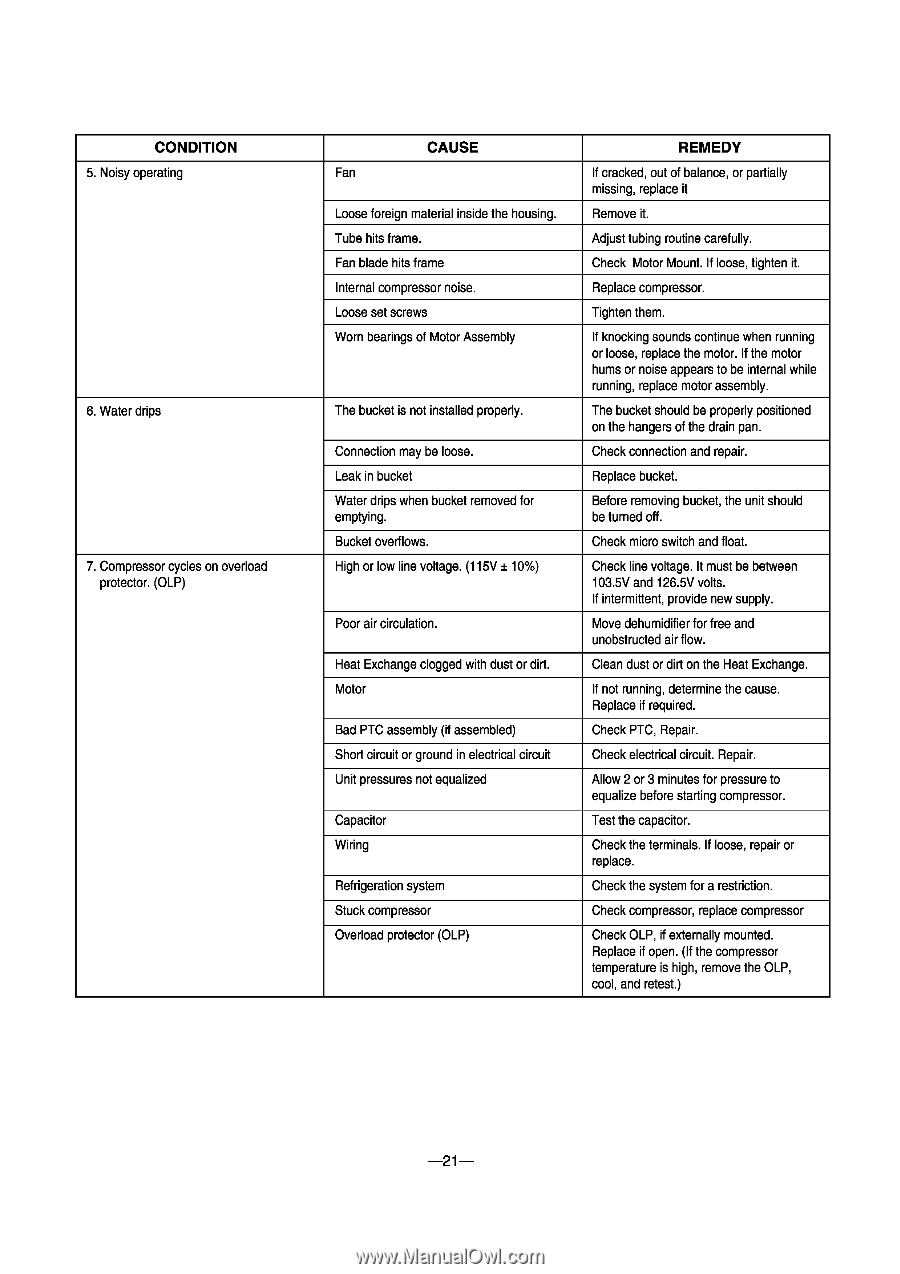
CONDITION 5. Noisy operating 6. Water drips 7. Compressor cycles on overload protector. (OLP) CAUSE Fan Loose foreign material inside the housing. Tube hits frame. Fan blade hits frame Internal compressor noise. Loose set screws Worn bearings of Motor Assembly The bucket is not installed properly. Connection may be loose. Leak in bucket Water drips when bucket removed for emptying. Bucket overflows. High or low line voltage. (115V ± 10%) Poor air circulation. Heat Exchange clogged with dust or dirt. Motor Bad PTC assembly (if assembled) Short circuit or ground in electrical circuit Unit pressures not equalized Capacitor Wiring Refrigeration system Stuck compressor Overload protector (OLP) REMEDY If cracked, out of balance, or partially missing, replace it Remove it. Adjust tubing routine carefully. Check Motor Mount. If loose, tighten it. Replace compressor. Tighten them. If knocking sounds continue when running or loose, replace the motor. If the motor hums or noise appears to be internal while running, replace motor assembly. The bucket should be properly positioned on the hangers of the drain pan. Check connection and repair. Replace bucket. Before removing bucket, the unit should be turned off. Check micro switch and float. Check line voltage. It must be between 103.5V and 126.5V volts. If intermittent, provide new supply. Move dehumidifier for free and unobstructed air flow. Clean dust or dirt on the Heat Exchange. If not running, determine the cause. Replace if required. Check PTC, Repair. Check electrical circuit. Repair. Allow 2 or 3 minutes for pressure to equalize before starting compressor. Test the capacitor. Check the terminals. If loose, repair or replace. Check the system for a restriction. Check compressor, replace compressor Check OLP, if externally mounted. Replace if open. (If the compressor temperature is high, remove the OLP, cool, and retest.)
-
 1
1 -
2
-
3
-
4
-
5
-
6
-
7
-
8
-
9
-
10
-
11
-
12
-
13
-
14
-
15
-
 16
16 -
 17
17 -
 18
18 -
 19
19 -
 20
20 -
 21
21 -
 22
22 -
 23
23 -
 24
24
 |
 |