LG DLE9577SM Owners Manual - Page 17
Accessories Installation
 |
View all LG DLE9577SM manuals
Add to My Manuals
Save this manual to your list of manuals |
Page 17 highlights
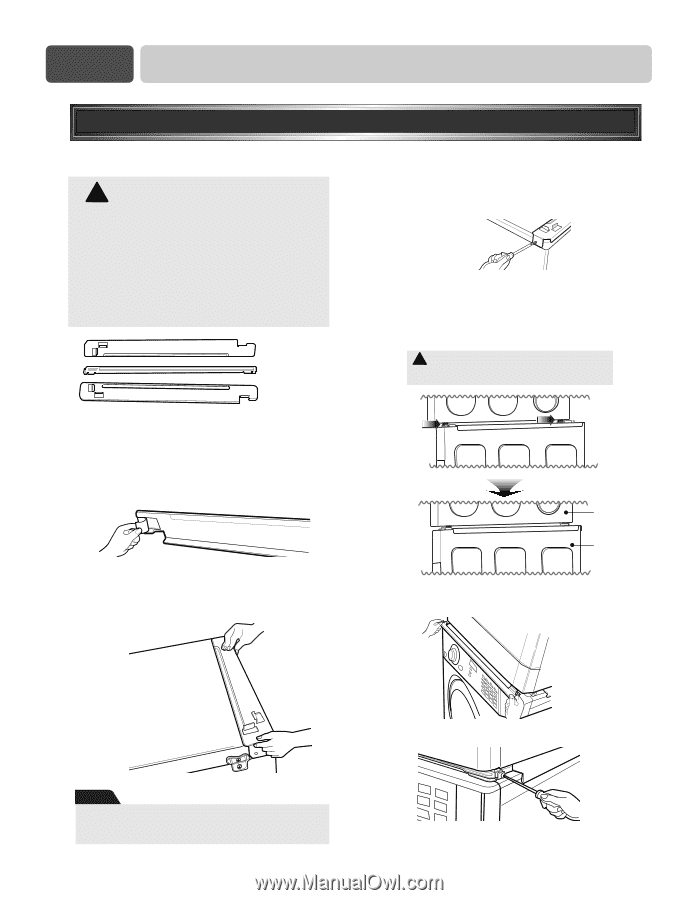
Part 4 ACCESSORIES INSTALLATION Stacking Kit Installation Instructions To ensure safe and secure installation, please observe the instructions below. ! WARNING! Incorrect Installation can cause serious accidents. The weight of the dryer and the height of installation makes the stacking procedure too risky for one person. This procedure should be performed by 2 or more experienced service personnel. Stacking kit 4 Secure stacking kit side bracket to the washer with a screw on the back of bracket. Repeat Steps 2, 3, 4 for the other side. 5 Place the dryer on top of the washer by fitting legs as shown in the picture. Avoid finger injuries - be careful not to pinch fingers between the washer and dryer. Slide dryer slowly backwards to the stopper of kit. ! WARNING! Do not stack a washer on the top of the dryer. 1 Place washer firmly on a stable, even and solid floor. 2 Peel protective paper off the tape from the stacking kit side bracket. Dryer Washer 3 Fit the stacking kit side bracket firmly to the side of top plate by attaching the doublesided tape to top plate as picture shows. 6 Insert the front rail. Push the front rail back to the stoppers of side stacking kit. Note Clean the surface before attaching the brackets and double-sided tape. 7 Attach both sides of the front kit with screws. • Do not use stacking kit with a gas dryer in potentially unstable conditions like a mobile home. 15
-
 1
1 -
2
-
3
-
4
-
5
-
6
-
7
-
8
-
9
-
10
-
11
-
 12
12 -
 13
13 -
 14
14 -
 15
15 -
 16
16 -
 17
17 -
 18
18 -
 19
19 -
 20
20 -
 21
21 -
 22
22 -
23
-
24
-
25
-
26
-
27
-
28
-
29
-
30
-
31
-
32
-
33
-
34
-
35
-
36
-
37
-
38
-
39
-
40
-
41
-
42
-
43
-
44
-
45
-
46
-
47
-
48
-
49
-
50
-
51
-
52
-
53
-
54
-
55
-
56
-
57
-
58
-
59
-
60
-
61
-
62
-
63
-
64
-
65
-
66
-
67
-
68
-
69
 |
 |