LG DLG2522W Owners Manual
LG DLG2522W Manual
 |
View all LG DLG2522W manuals
Add to My Manuals
Save this manual to your list of manuals |
LG DLG2522W manual content summary:
- LG DLG2522W | Owners Manual - Page 1
DLE2512W/DLG2522W DLE2514W/DLG2524W - LG DLG2522W | Owners Manual - Page 2
DLE2512W/DLG2522W DLE2514W/DLG2524W P/No.: 3828EL3004B - LG DLG2522W | Owners Manual - Page 3
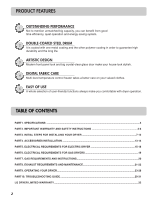
REQUIREMENTS FOR ELECTRIC DRYER 15-18 PART6. ELECTRICAL REQUIREMENTS FOR GAS DRYERS 19 PART7. GAS REQUIREMENTS AND INSTRUCTIONS 20 PART8. EXHAUST REQUIREMENTS AND MAINTENANCE 21-22 PART9. OPERATING YOUR DRYER...23-28 PART10. TROUBLESHOOTING GUIDE ...29-31 LG DRYER LIMITED WARRANTY ...32 2 - LG DLG2522W | Owners Manual - Page 4
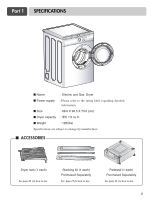
Part 1 SPECIFICATIONS I Name : Electric and Gas Dryer I Power supply : Please refer to the rating label regarding detailed information. I Size : 68.6 X 96.5 X 73.0 (cm) I Dryer capacity : IEC 7.0 cu.ft. I Weight : 126(Ibs) Specifications are subject to change by manufacturer. I ACCESSORIES - LG DLG2522W | Owners Manual - Page 5
of this manual. Warranty service is available by contacting your nearest LG Service Center and, for warranty period from the date of purchase, if this dryer is installed and operated according to the instructions in this manual, LG will repair or replace any of its mechanical or electrical parts if - LG DLG2522W | Owners Manual - Page 6
drum is moving. 6) Do not install or store this appliance where it will be exposed to the weather. 7) Do not tamper with controls. 8) Do not repair or replace any part of the appliance or attempt any servicing unless specifically recommended in the user-maintenance instructions. 9) Do not use heat - LG DLG2522W | Owners Manual - Page 7
Part 2 IMPORTANT WARRANTY AND SAFETY INSTRUCTIONS ! WHAT TO DO IF YOU SMELL GAS: • Do not try to light a match or cigarette, or turn on any gas or electrical appliance. • Do not touch any electrical switches. Do not use any phone in your building. • Clear the room, building or area of all - LG DLG2522W | Owners Manual - Page 8
it is important that you review this entire manual before proceeding with any installation or use. More detailed instructions concerning electrical connections, gas connections, and exhaust requirements are provided at other parts of this manual. STEP 1 Positioning the Dryer. Choose a location with - LG DLG2522W | Owners Manual - Page 9
tumble properly and internal sensors may malfunction. Note: Other sections of this manual also provide important information concerning the placement of and clearances for your dryer. Please review this entire manual before proceeding with any installation. SSTTEEPP 22: Procedure for Reversing the - LG DLG2522W | Owners Manual - Page 10
outdoors. Please follow the instructions (and all others in this manual) very carefully. I ALTERNATE EXHAUST DIRECTIONS 1. Remove a screw and exhaust duct. 2-1. Detach and remove a knockout at the button, left or right side as desired. (Right Side Vent not available on Gas dryer) , , the order of - LG DLG2522W | Owners Manual - Page 11
(Gas dryer only). In addition to the following, please refer to manual section on Gas Requirements and Instructions. 1 2 5 3 4 1. New stainless steel flexible connector. Use this type of connector only if allowed by local codes. Use Design AGA Certified Connector. 2. 1/8" NPT Pipe Plug (for checking - LG DLG2522W | Owners Manual - Page 12
of the dryer. Plug-in your dryer after reviewing the following parts on your dryer's Electrical Requirements. STEP 7 Confirming Heat Source Operation. Confirming Heat Source in Gas Dryers Close the door to the dryer drum/drying compartment and, after completing all steps in this manual for proper - LG DLG2522W | Owners Manual - Page 13
codes and ordinances. If you are uncertain whether your proposed installation will comply with these standards, please contact a service and installation professional for assistance. The following instructions apply to any installation of the dryer in a manufactured or mobile home: 1) The gas dryer - LG DLG2522W | Owners Manual - Page 14
- be careful not to pinch fingers between the washer and dryer. Slide washer slowly backwards to the stopper of kit. 1 Stacking kit Place washer firmly on a stable, even and solid floor as product installation instructions describes in owner's manual. 2 Peel protective paper off the tape from the - LG DLG2522W | Owners Manual - Page 15
Part 4 ACESSORIES INSTALLATION Pedestal Installation Instructions 1 4 2 5 6 3 7 14 - LG DLG2522W | Owners Manual - Page 16
circuit must be fused on both sides of the line). ELECTRICAL SERVICE FOR THE DRYER SHOULD BE OF MAXIMUM RATE VOLTAGE LISTED ON THE NAMEPLATE. DO NOT CONNECT DRYER TO 110, 115, OR 120 VOLT CIRCUIT. Heating elements are available for field installation in dryers which are to be connected to electrical - LG DLG2522W | Owners Manual - Page 17
DRYERS Review the following options to determine the appropriate electrical connection for your home: 4-wire receptacle (NEMA type14-30R) Use the instructions at this section if your home has a 4-wire receptacle (NEMA type 14-30R) and you will be using a UL listed for dryer to be replaced. First - LG DLG2522W | Owners Manual - Page 18
available. Prepare minimum 5ft(1.52m) of length in order for dryer to be replaced. First, peel 3 1/2 inch (8.9cm) of covering material from end and bare 1 inch from the ends. Option 1: 4-wire connection with a Power supply cord. • lf your local codes or ordinances do not allow the use of a 3 wire - LG DLG2522W | Owners Manual - Page 19
Part 5 ELECTRICAL REQUIREMENTS FOR ELECTRIC DRYERS Option 2: 3-Wire Connection with a Power Supply Cord lf your local codes or ordinances permit the connection of a frame-grounding conductor to the neutral wire, use these instructions. If your local codes or ordinances do not allow the connection - LG DLG2522W | Owners Manual - Page 20
electrical connections and requirements for gas dryers. ! Important Warning: To help prevent fire, electric shock, serious injury or death, the wiring and grounding must conform to the latest edition of the National Electrical Code, ANSI/NFPA 70, or the Canadian Electrical Code, CSA C22.1, and all - LG DLG2522W | Owners Manual - Page 21
Part 7 GAS REQUIREMENTS AND INSTRUCTIONS Following are important instructions and information concerning the requirements for the gas supply and service for gas dryers. ! Important Warning: The gas supply and service for a gas dryer must comply with all local codes and ordinances. In the absence of - LG DLG2522W | Owners Manual - Page 22
Part 8 EXHAUST REQUIREMENTS AND MAINTENANCE Following are important instructions and information concerning the exhaust requirements for your dryer. ! Important Warning: To reduce the risk of fire, combustion, or accumulation of combustible gases, DO NOT exhaust dryer air into an enclosed and - LG DLG2522W | Owners Manual - Page 23
increase drying times. 11. Annually remove the lint filter and attach it to the vacuum duct. See item #2 above. 12. Please note that the wiring diagram is provided inside the dryer control hood. Label all wires prior to disconnection when servicing the dryer, because wiring errors can cause serious - LG DLG2522W | Owners Manual - Page 24
and vapors, such as gasoline, away from dryer. Do not dry anything that has ever had anything flammable on it (even after washing). Failure to follow these instructions can result in death, explosion, or fire. ! WARNING! Fire Hazard No washer can completely remove oil. Do not dry anything that has - LG DLG2522W | Owners Manual - Page 25
Part 9 OPERATING YOUR DRYER needed. 3. To use a Manual Dry Cycle • Select a Manual Dry Cycle. • Press MORE instruction can help reduce your utility bill, prolong the life of your clothes, and decrease the likelihood of uneven drying and wrinkle. Following are sample loads for Super Capacity Dryers - LG DLG2522W | Owners Manual - Page 26
CL is displayed. To unlock, press and hold DRY LEVEL for 3 seconds. The indicator light turns off. 6. Cycle Descriptions Select the drying cycle that matches the type of load you are drying. (See Sensor Dry or Manual Preset Cycle Settings charts.) Sensor Dry Cycles allow you to match the cycle to - LG DLG2522W | Owners Manual - Page 27
Part 9 OPERATING YOUR DRYER Manual Preset Cycle Settings Manual Dry Temp. Cycles Load Type Default Time* (Minutes) SPEED DRY SMALL LOADS AIR DRY High 25 Air Dry 30 8. Modifiers Use Modifiers to select temperatures for the Manual 20 * Reset cycle to complete drying, if needed. • Check to - LG DLG2522W | Owners Manual - Page 28
shape the items to lay flat on the dryer rack. 1.Open the door. Hold the dryer rack with both hands. 2. Put the dryer rack into the drum 3. Make sure that dryer is evenly placed right onto the drum inside and door rim. NOTE: Check the lint screen and remove any lint accumulated from items dried on - LG DLG2522W | Owners Manual - Page 29
Part 9 OPERATING YOUR DRYER Maintenance Clean lint filter Clean the lint filter after each use and check it before use. Not cleaning or emptying the filter will increase drying time and energy consumption, therefore dryer life expectancy could be shortened after all. I Clean the door and its - LG DLG2522W | Owners Manual - Page 30
heat. Check your home's or laundry room's fuse box / circuit breaker box and replace the fuse or reset the circuit breaker. (IMPORTANT: electric dryers generally use two fuses or breakers.) • Is the gas supply or service blocked or off? Confirm that the house gas shutoff and the dryer gas shutoff - LG DLG2522W | Owners Manual - Page 31
Part 10 TROUBLESHOOTING GUIDE 4.Problem:There is Lint on my Clothes Question What to Do • Is your lint filter full? Please refer to the manual section on cleaning the lint filter, and please confirm that the lint filter is clean. It is important that the lint filter is clean before each new load - LG DLG2522W | Owners Manual - Page 32
moisture. • Are you removing your laundry from the dryer soon after the drying cycle is complete? Remove your laundry from the dryer after the drying cycle ends and either hang or fold the items. 9.Problem:My clothes are shrinking Question What to Do • Are you following the care instructions - LG DLG2522W | Owners Manual - Page 33
LG DRYER LIMITED WARRANTY - USA 6 6 32
-
 1
1 -
 2
2 -
 3
3 -
 4
4 -
 5
5 -
 6
6 -
 7
7 -
8
-
9
-
10
-
11
-
12
-
13
-
14
-
15
-
16
-
17
-
18
-
19
-
20
-
21
-
22
-
23
-
24
-
25
-
26
-
27
-
28
-
29
-
30
-
31
-
32
-
33
 |
 |

DLE2512W/DLG2522W
DLE2514W/DLG2524W