LG HBLG6000R Service Manual - Page 13
Installation
 |
View all LG HBLG6000R manuals
Add to My Manuals
Save this manual to your list of manuals |
Page 13 highlights
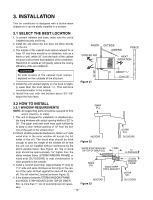
3. INSTALLATION This air conditioner is designed with a button-down chassis so it can be easily installed in a window. 3.1 SELECT THE BEST LOCATION 1. To prevent vibration and noise, make sure the unit is installed securely and firmly. 2. Install the unit where the sun does not shine directly on the unit. 3. The outside of the cabinet must extend outward for at least 10" and there should be no obstacles, such as a fence or wall, within 20" from the back of the cabinet because it will prevent heat radiation of the condenser. Restriction of outside air will greatly reduce the cooling efficiency of the air conditioner. CAUTION All side louvers of the cabinet must remain exposed on the outdside of the structure. 4. Install the unit slanted slightly so the back is slightly lower than the front (about 1/4"). This will force condensed water to the outside. 5. Install the unit with the bottom about 30"~60" above the floor level. INSIDE COOLED AIR OUTSIDE AWNING FENCE HEAT RADIATION 30"-60" Figure 21 ABOUT / 1 4 " Over 20" 3.2 HOW TO INSTALL 3.2.1 WINDOW REQUIREMENTS INNER SILL NOTE: All supporting parts should be secured to firm wood, masonry, or metal. 1. This unit is designed for installation in standard dou- ble hung windows with actual opening widths of 22" to 36". The upper and lower sash must open sufficiently to allow a clear vertical opening of 13" from the bot- tom of the sash to the window stool. 2.If storm window presents interference, fasten a 2" wide OUTER SILL wood strip to the inner window sill across the full INDOORS OUTDOORS width of the sill. The wood strip should be thick enough to raise the height of the window sill so that Figure 22 the unit can be installed without interference by the storm window frame. See Figure. 23. Top of wood strip should be approximately 3/4" higher than the WOOD STRIP MOUNTED ON TOP OF INNER SILL 1" MAX. 3/4" CLEARANCE storm window frame (STORM WINDOW FRAME) or wood strip (OUTDOORS) to help condensation to drain properly to the outside. 3. Install a second wood strip (approximately 6" long by 11/2" wide and same thickness as first strip) in the center of the outer sill flush against the back off the inner sill. This will raise the L bracket as shown Figure. 23. 4. If the distance between STORM WINDOW FRAME and WOOD STRIP MOUNTED ON TOP OF INNER SILL is more than 1", two of wood strip are not neces- INNER SILL WOOD STRIP FOR L BRACKET INDOORS Figure 23 STORM WINDOW FRAME OUTER SILL OUTDOORS sary. -13-
-
 1
1 -
2
-
3
-
4
-
5
-
6
-
7
-
 8
8 -
 9
9 -
 10
10 -
 11
11 -
 12
12 -
 13
13 -
 14
14 -
 15
15 -
 16
16 -
 17
17 -
 18
18 -
19
-
20
-
21
-
22
-
23
-
24
-
25
-
26
-
27
-
28
-
29
-
30
-
31
-
32
-
33
-
34
 |
 |
