LG LRE30453SB Owner's Manual (English) - Page 20
Setting Broil, Setting Delayed Timed - broiler pan
 |
UPC - 048231316095
View all LG LRE30453SB manuals
Add to My Manuals
Save this manual to your list of manuals |
Page 20 highlights
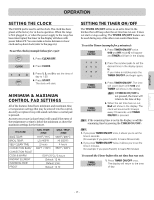
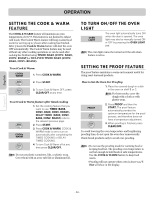
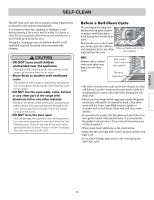
OPERATION English Español SETTING DELAYED TIMED BAKE The BAKE , COOK TIME and START TIME pads control the Delayed Timed Bake feature. The automatic timer of the Delayed Timed Bake will turn the oven ON and OFF at the time you select in advance. To program the oven for a Delay Start and to shut off automatically (example for baking at 300°F for 30 minutes and starting at 4:30): 1. Be sure that the clock is set with the correct time of day. 2. Arrange interior oven rack(s) and place the food in the oven. 3. Press BAKE. 350° will appear in the display. 4. Press 3, 0, and 0. BAKE will flash and 300° will appear in the display. 5. Press COOK TIME. TIMED will flash; BAKE, 0:00 and 300° will appear in the display. Note: If you want to change cook time, repeat steps 5~6 and press START. 6. Enter the desired baking time using the number pads by pressing 3 and 0. TIMED will flash; BAKE, 30:00 and 300° will appear in the display. Note: Baking time can be set for any amount of time from 1 minute to 11 hours and 59 minutes. 7. Press START TIME. Enter the desired start time using the number pads 4, 3, and 0. 8. Press START. At the set time, a short beep will sound. The oven will begin to Bake. When the oven has reached the desired temperature, a long beep will sound 5 times and oven lamp will flash. The display will show 300° and BAKE. Note: Press CLEAR/OFF to cancel the Delayed Timed Bake feature at any time. When the set bake time runs out: 1. End and the time of day will show in the display. The oven will shut off automatically. 2. The unit will continue to beep 3 times every minute until CLEAR/OFF is pressed. SETTING BROIL Leave the door open to the broil stop position. The door will stay open by itself, yet the proper temperature is maintained in the oven. Broil Stop Position To set the oven to broil at the Hi or Lo setting: 1. Place the meat or fish on the broiler grid in the broiler pan. 2. Follow suggested rack positions in the Broiling Guide. 3. Press BROIL once for Hi broil or twice for Lo broil. Use Lo to cook foods such as poultry or thick cuts of meat thoroughly without overbrowning them. 4. Press START. The oven will begin to broil. 5. Broil on one side until food is browned; turn and cook on the other side. Note: Always pull the rack out to the stop position before turning or removing food. 6. To cancel broiling or if finished broiling press CLEAR/OFF. CAUTION • Should an oven fire occur, leave the oven door closed and turn the oven off. If the fire continues, throw baking soda on the fire or use a fire extinguisher. • DO NOT put water or flour on the fire. - Flour may be explosive and water can cause a grease fire to spread and cause personal injury. - 20 -
-
 1
1 -
2
-
3
-
4
-
5
-
6
-
7
-
8
-
9
-
10
-
11
-
12
-
13
-
14
-
 15
15 -
 16
16 -
 17
17 -
 18
18 -
 19
19 -
 20
20 -
 21
21 -
 22
22 -
 23
23 -
 24
24 -
 25
25 -
26
-
27
-
28
-
29
-
30
-
31
-
32
-
33
-
34
-
35
-
36
 |
 |