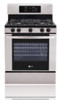
LG LRG3091ST Owner's Manual - Page 17
Using The Clock And Timer - 00
 |
View all LG LRG3091ST manuals
Add to My Manuals
Save this manual to your list of manuals |
Page 17 highlights
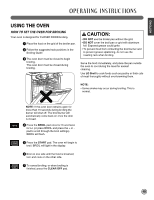
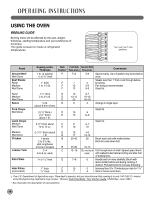
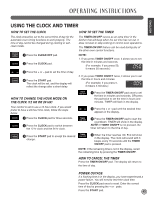
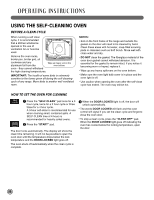
OPERATING INSTRUCTIONS ENGLISH USING THE CLOCK AND TIMER HOW TO SET THE CLOCK The clock should be set to the correct time of day for the automatic oven timing functions to work properly. The time of day cannot be changed during cooking or selfclean mode. ᕡ Press the CLEAR OFF pad. ᕢ Press the CLOCK pad. ᕣ Press the + or - pad to set the time of day. ᕤ Press the START pad. The clock will be set, and the display will reflect the change after a short delay. HOW TO SET THE TIMER The TIMER ON/OFF serves as an extra timer in the kitchen that will beep when the set time has run out. It does not start or stop cooking or control oven operations. The TIMER ON/OFF feature can be used during any of the other oven control functions. NOTE: 1. If you press TIMER ON/OFF once, it allows you to set the time in minutes and seconds. (For example: if you press 50, it means 50 seconds.) 2. If you press TIMER ON/OFF twice, it allows you to set the time in hours and minutes. (For example: if you press 5, it means 5 minutes.) HOW TO CHANGE THE HOUR MODE ON THE CLOCK (12 HR OR 24 HR) Your control is set to use a 12 hour clock. If you would prefer to have a 24 hour time clock, follow the steps below. ᕡ Press the CLOCK pad for three seconds. ᕢ Press the CLOCK pad to switch between the 12 hr clock and the 24 hr clock. ᕡ Press the TIMER ON/OFF pad once to set the time in minutes and seconds, OR press the pad twice to set the time in hours and minutes. TIMER will flash in the display. ᕢ Press the + or - pad until the desired time appears in the display. ᕣ Press the TIMER ON/OFF pad to start the countdown. TIMER will show in the display. NOTE: If TIMER ON/OFF is not pressed, the timer will return to the time of day. ᕣ Press the START pad to accept the desired change. ᕤ When the timer reaches :00, End will show in the display. The clock will sound with 3 beeps every 15 seconds until the TIMER ON/OFF pad is pressed. NOTE: If the remaining time is not in the display, recall the remaining time by pressing the TIMER ON/OFF. HOW TO CANCEL THE TIMER Press the TIMER ON/OFF pad. The display will return to the time of day. POWER OUTAGE If a flashing time is in the display, you have experienced a power failure. You will need to reset the clock time. Press the CLOCK pad once to reset. Enter the correct time of day by pressing the + or - pads. Press the START pad. 17
-
 1
1 -
2
-
3
-
4
-
5
-
6
-
7
-
8
-
9
-
10
-
11
-
 12
12 -
 13
13 -
 14
14 -
 15
15 -
 16
16 -
 17
17 -
 18
18 -
 19
19 -
 20
20 -
 21
21 -
 22
22 -
23
-
24
-
25
-
26
-
27
-
28
-
29
-
30
-
31
-
32
-
33
-
34
-
35
-
36
-
37
 |
 |
